Build Your First Module
In this tutorial, you’ll learn how to build a simple module.
First, decide whether you’d like to build your module with C# or Java. Then follow the instructions below for your preferred language.
Generate a Module
Install Templates
With the .NET 8 (or higher) SDK installed, run the following command to install the project templates. This will enable you to access module templates through Visual Studio.
dotnet new install Scaleout.Modules.Templates
Create a message module
You can then create a message module through Visual Studio or run the following command:
dotnet new msgmodule -n QuickStart
This will generate a new Visual Studio project named QuickStart that you can modify to suit your needs.
Run the following to generate a Maven project configured
mvn archetype:generate \
    -DarchetypeGroupId=com.scaleoutsoftware.archetypes \
    -DarchetypeArtifactId=scaleout-msg-module \
    -DarchetypeVersion=3.1.0 \
    -DgroupId=com.mycompany.quickstart \
    -DartifactId=quickstart \
    -DsossObjectName=QuickStart \
    -DinteractiveMode=false
These options perform the following functions:
Property |
Description |
|---|---|
|
Your organization or namespace |
|
Name of the generated project directory + artifact id |
|
The class representing each SossObject |
The command generates a new folder (quickstart) containing:
Java class stubs for your msg module
A sample working unit test demonstrating sending a message
A pre-configured
scaleoutPackage.jsonmetadata fileA Maven project file (
pom.xml) with preconfigured dependenciesA build pipeline for packaging your project for deployment
Modify the Module
Modify the newly generated MSG module to accept JSON serialized messages that update the status of the state object.
The generated ExampleMessage class holds an example property Status.
public class ExampleMessage
{
    public string? Status { get; set; }
}
Modify the QuickStartSossObject to store a string CurrentStatus
public class QuickStartSossObject
{
    public required string Id { get; init; }

    public string? CurrentStatus { get; set; }
}
Make sure the QuickStartMessageProcessor sets the current status of the state object to the payload of the incoming message:
public override Task<ProcessingResult> ProcessMessageAsync(
                                               MessageProcessingContext<QuickStartSossObject> context,
                                               QuickStartSossObject sossObject,
                                               byte[] msgBytes)
{
    // TODO: Implement your message processing logic here.

    // Example: Deserialize the message bytes into a specific message type.
    ExampleMessage? message = System.Text.Json.JsonSerializer.Deserialize<ExampleMessage>(msgBytes);
    if (message is null)
    {
        _logger.LogWarning("Message deserialization failed. Message bytes: {MsgBytes}", Convert.ToBase64String(msgBytes));
        return Task.FromResult(ProcessingResult.NoUpdate);
    }

    // Update the SOSS object with the message data.
    sossObject.CurrentStatus = message.Status;

    // The SOSS object was modified, so we return DoUpdate to indicate that
    // it should be updated in the ScaleOut service.
    return Task.FromResult(ProcessingResult.DoUpdate);
}
Update ExampleMessage to use JSON serialization from Jackson databind:
public class ExampleMessage {
    private String stringPayload;
    public ExampleMessage() {}
    public ExampleMessage(String stringPayload) {
        this.stringPayload = stringPayload;
    }

    public String getStringPayload() { return stringPayload; }
    public void setStringPayload(String stringPayload) { this.stringPayload = stringPayload; }

    private static final ObjectMapper mapper = new ObjectMapper();
    public static byte[] serialize(ExampleMessage msg) {
        try {
            return mapper.writeValueAsBytes(msg);
        } catch (IOException e) {
            throw new RuntimeException("Serialization failed", e);
        }
    }
    public static ExampleMessage deserialize(byte[] bytes) {
        try {
            return mapper.readValue(bytes, ExampleMessage.class);
        } catch (IOException e) {
            throw new RuntimeException("Deserialization failed", e);
        }
    }
}
Update QuickStart to store a string currentStatus:
public class QuickStart {
    private String currentStatus;
    private String Id;
    public QuickStart(String id) {
        Id = id;
    }
    public String getStatus() {
        return currentStatus;
    }
    public void setStatus(String incomingStateChange) {
        currentStatus = incomingStateChange;
    }
}
Update the QuickStartMessageProcessor to set the current status of the state object to the payload of the incoming message:
ExampleMessage msg = ExampleMessage.deserialize(message);
sossObject.setStatus(msg.getStringPayload());
Update TestModule to use new ExampleMessage definition.
// instantiate the module package
ModulePackage modulePackage = new ModulePackage();
// define the MsgModuleOptions
MsgModuleOptions<QuickStart> msgModuleOptions = new MsgModuleOptionsBuilder<QuickStart>(QuickStart.class).build();
// add the MSG module to the package
modulePackage.addMsgModule("QuickStart", new QuickStartMessageProcessor(), msgModuleOptions);
// run a local development package
modulePackage.runLocalDevelopmentEnvironment();
// instantiate a development MsgModuleClient
MsgModuleClient<QuickStart> client = new MsgModuleClientBuilder<QuickStart>("QuickStart", QuickStart.class).buildLocalDevelopmentClient();
// send a message with an expected value of "Hello World"
String expected = "Hello World";
client.sendToModule("SomeUniqueId", ExampleMessage.serialize(new ExampleMessage(expected))).get();
// read the cached object
Cache<String, QuickStart> cache = client.getCacheForModule();
CacheResponse<String, QuickStart> response = cache.read("SomeUniqueId");
// check that the object was created
Assert.assertSame(RequestStatus.ObjectRetrieved, response.getStatus());
// check that the sent value was properly assigned
Assert.assertEquals(expected, response.getValue().getStatus());
Package the Module
Publish the Visual Studio project
In Visual Studio, right-click on the QuickStart project in Visual Studio’s solution explorer and select “Publish”. The publishing window will allow you to select from several predefined targets (Windows vs. Linux). Click the “Publish” button to create a zipped deployment package.
Run the following from the quickstart directory:
mvn package
This will create a quickstart.zip ZIP archive in quickstart/target.
Deploy the Module
Use the ScaleOut Active Caching UI to upload the package and manage your deployment.
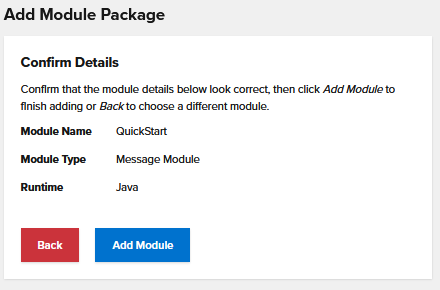
In the UI, navigate to the Modules page.
Under the Add Module Package section, click Select File, browse to the directory where your module package ZIP archive is located, and select your module. Click Continue. You should now see the name of your module for the Module Name field and Message Module for the Module Type.
Send a Message to the Module
Next, send a message using the built-in REST service.
Create an API key
We’ll first create an API key that allows us to connect to the REST service.
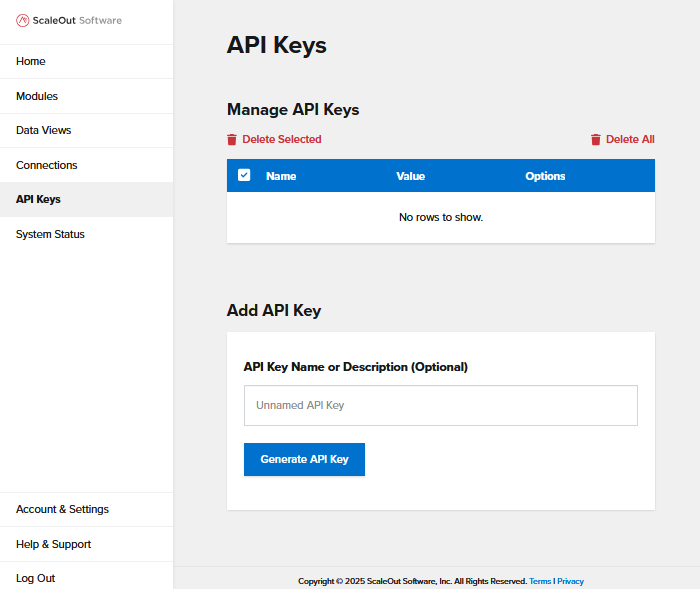
In the UI, navigate to the API Keys page.
Enter a name for your API key and click Generate API Key. Click Copy Key in the table to copy the key. We’ll use it in the next step.
Send a Message
Navigate to the Swagger page for the Messaging REST API: https://localhost:8801/swagger/index.html
Open the endpoint POST /Messages/{module}/{instanceId} and click Try it out.
Fill out the parameters:
module: QuickStart
instanceId: MyFirstInstance
apiKey: the API key you generated in the previous step
Note
Any alphanumeric string is a valid instance ID.
For the request body, enter the following:
[{
    "Status": "In-Progress"
}]
[{
    "stringPayload": "Hello World"
}]
Important
When sending messages through the messaging REST API, the request body must be enclosed in square brackets in order to be deserialized, even if you’re only sending one message.
Click the Execute button, and the request should return a 202 status.
Congratulations! You have successfully deployed your first ActiveCaching module. Continue to the next section to learn about the next steps you can take with ScaleOut ActiveCaching Modules.