Deploying in Microsoft Azure
Introduction
Running ScaleOut StateServer in a Microsoft Azure environment allows for the creation of highly-scalable in-memory data grids and takes full advantage of cloud environment benefits such as minimal IT overhead, zero upfront hardware costs, and on-demand scaling. Usage of ScaleOut StateServer in Microsoft Microsoft Azure uses subscription-based licensing and requires a purchase of a valid ScaleOut StateServer license.
Terminology
The following terms defined by Microsoft Azure are used in this help file and defined here for your convenience:
Microsoft Azure Portal: The secure Web portal that allows users to manage their Microsoft Azure resources. It provides a graphical user interface (GUI) and command-line experience.
Azure Subscription: A logical unit of Azure services that are linked to an Azure account. It is used to manage various technical resources, billing, and access control.
Resource Group: A logical container within Microsoft Azure that allows you to group related resources together, like virtual machines, virtual networks, storage accounts, application services, etc. By managing them as a single unit, it makes them easier to deploy, update, and delete them together based on their lifecycle and security needs.
Virtual Machine Scale Set (VMSS): A Microsoft Azure service that allows you to create and manage groups of virtual machines (VMs). VMSS can automatically scale the number of VMs up or down based on demand, rules or a schedule. ScaleOut StateServer is deployed as a set of VMs in a VMSS.
Proximity Placement Group: A logical grouping of Azure compute resources that are physically colocated in the same data center. Placement groups are used to reduce network latency between resources.
Azure Virtual Network (VNet): A cloud service that allows users to create and manage private networks. A virtual network is a logical isolation of the Azure cloud that is dedicated to your subscription.
Azure Network Security Group (NSG): A security group that contains a list of security rules that allow or deny inbound or outbound network traffic to resources connected to Azure Virtual Network.
Public IP Prefix: A range of contiguous public IP addresses that can be used to assign public IP addresses to Azure resources.
Accelerated Networking: A feature that improves the networking performance of virtual machines.
Azure CLI: The Azure command-line interface (Azure CLI) is a set of commands used to create and manage Azure resources.
Deploying Store In Azure Using The ScaleOut Management Console
Prerequisites
- Azure subscription
To deploy ScaleOut StateServer (SOSS) in a Microsoft Microsoft Azure environment, begin by visiting https://azure.microsoft.com/ and signing up for a Microsoft Azure subscription.
- Register an application in Microsoft Entra ID for authentication and authorization
You will need to register an app in Azure to be used as an intermediate between ScaleOut and Azure (or between your client application and Azure). This app registration allows Azure to authenticate and authorize your application, issue tokens and allow API calls to Azure. You will define permissions for that app, which will define permissions for your client app.
Please refer to our section on Registering an application in Microsoft Entra ID for complete details on how to register the app.
- Upload a certificate for authentication to Microsoft Entra ID
If you use the ScaleOut Management Console as a remote client or if your client app needs to talk to the ScaleOut cluster deployed in Azure, you will need an SSL certificate that uses the RSA algorithm. Certificates are used as secrets to prove the application’s identity when requesting a token. You will associate that certificate with your registered application, and then you can use it later to authenticate to Azure to make API calls or to let the ScaleOut Management Console request tokens.
It acts as a replacement for a user name and password. Your client app will use the private certificate to authenticate to Azure. The certificate is associated in Azure with the registered app, it will get authorized based on the permissions associated with the app you registered in Microsoft Entra ID.
Please refer to our section on Registering an application in Microsoft Entra ID for complete details on how to upload the certificate to your registered app.
- Required Azure Permissions
To deploy a StateServer cluster to Azure, you need access to all operations on the Microsoft.Resources/deployments resource type and the write access on the following deployed resources:
Microsoft.Resources/deployments/*
Microsoft.Network/virtualNetworks/write
Microsoft.Network/virtualNetworks/subnets/write
Microsoft.Network/networkSecurityGroups/write
Microsoft.Compute/virtualMachineScaleSets/write
Microsoft.Storage/storageAccounts/write
Microsoft.Compute/proximityPlacementGroups/write
For a list of roles and permissions, see Azure built-in roles.
Enable the Azure Management View
Enable Azure Management by clicking on the main menu View->Show Azure Management:
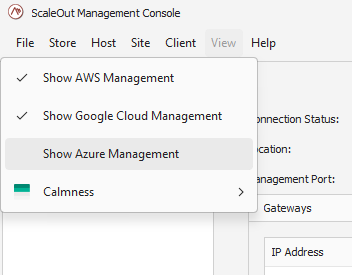
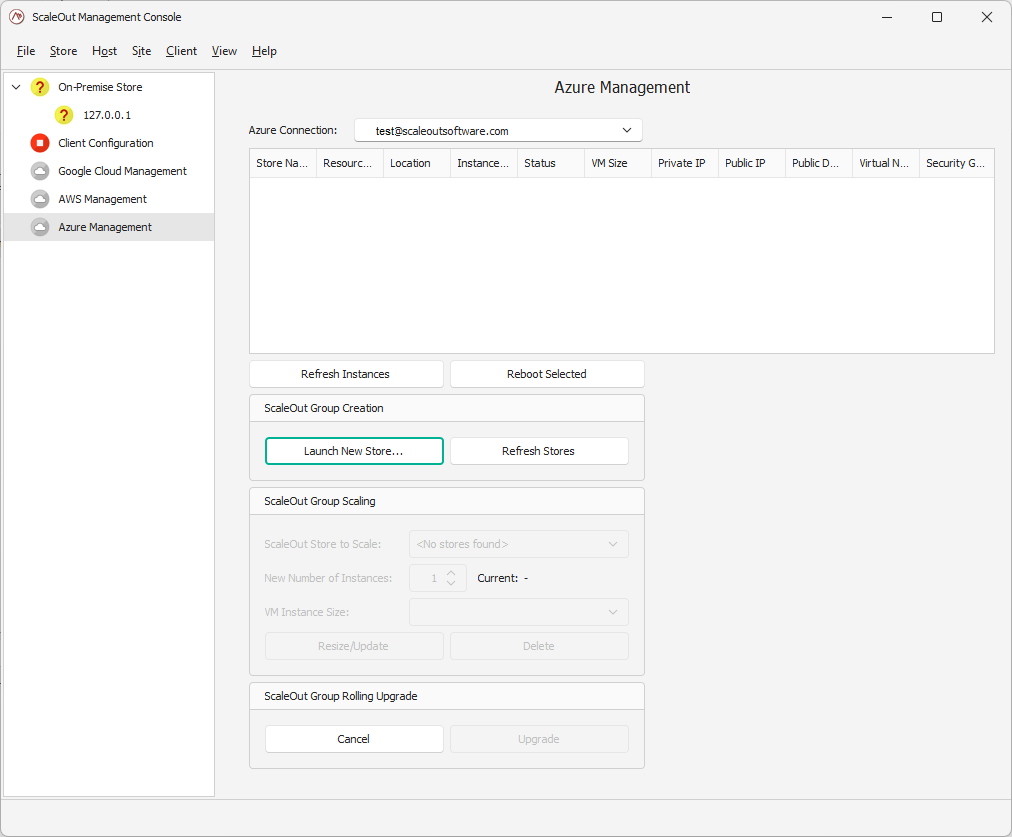
This will bring up the Azure Management node in the left pane. Once you select this node, the Azure Management pane will open on the right.
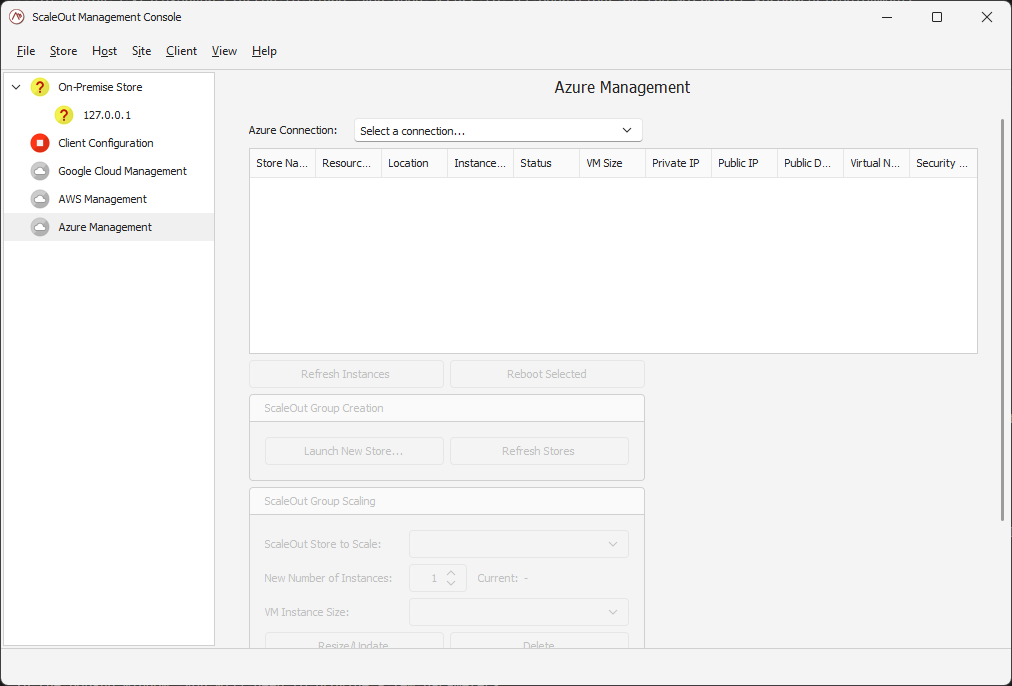
Establish a connection
If you have never connected to Azure on this machine, you will need to first establish a connection with Azure. Click on the Select a connection box to bring up the connection manager.
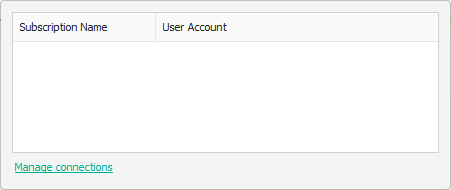
To add a new connection, pick the Manage connections link.
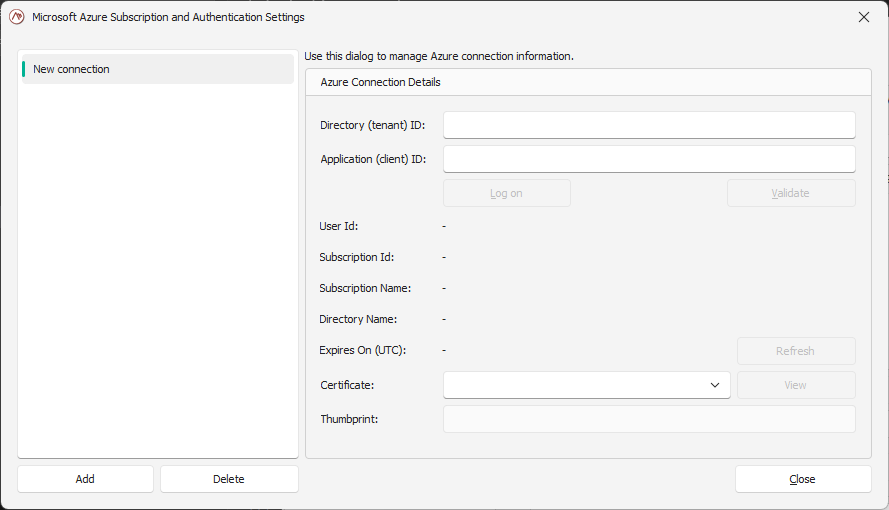
In the pop-up window, you will need to provide a few parameters:
Directory ID (Tenant ID): You can find your Directory ID in the Azure portal in the Directories + Subscriptions page, accessible from the gear menu in the top navigation bar.
Application ID (Client ID): The Application ID for the app you registered in Microsoft Entra ID.
A certificate: the one you uploaded when you registered the app for the Microsoft Entra ID.
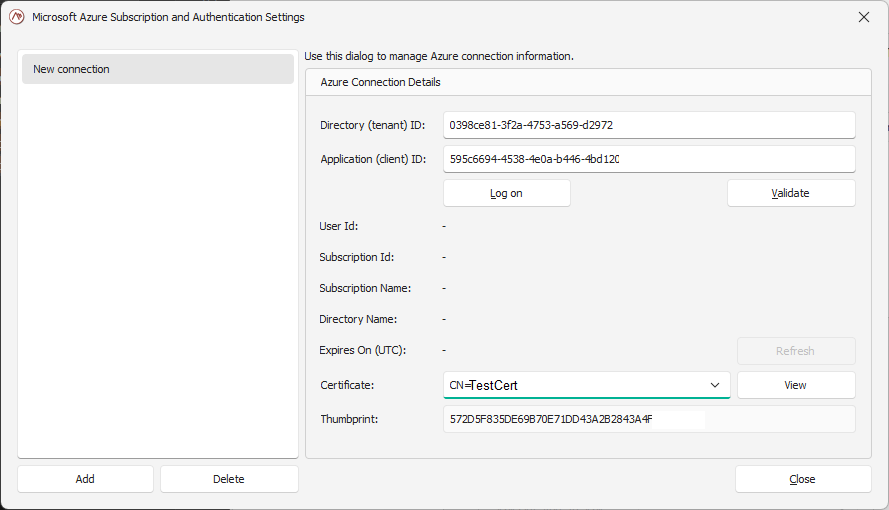
Click on Log on to enter your Azure credentials. You will be authenticating directly with Azure and those credentials are not accessed or stored by ScaleOut.
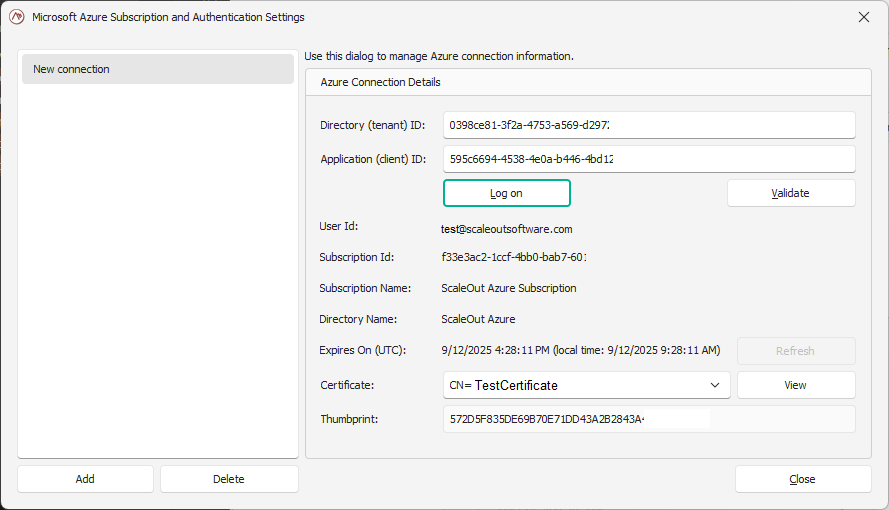
You can validate the connection by clicking on the Validate button.
Launch a new store
Once you have selected a connection, you can start the creation of a new store by clicking on Launch New Store....
This will open a wizard which will guide you through the available parameters.
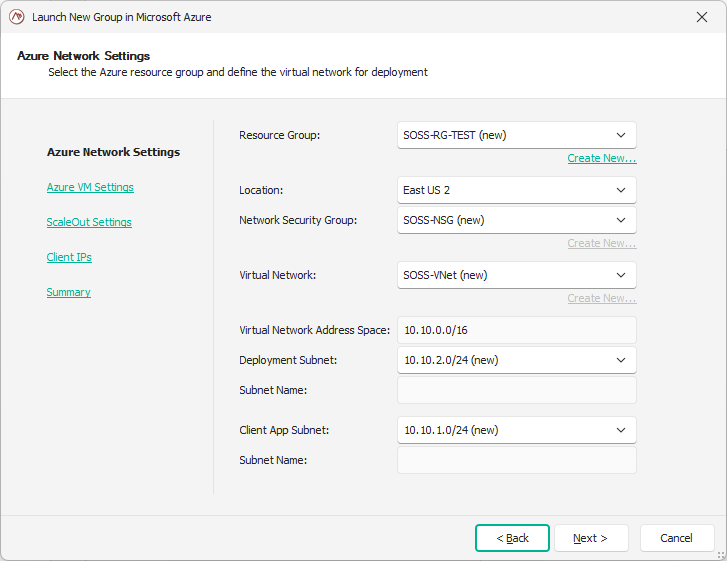
In the first page of the wizard, you will select the Azure network settings. This includes:
Resource Group (RG): The name of the Azure resource group where the ScaleOut StateServer store will be deployed together with other resources, such as virtual network, security group, etc.
Location: the region in which to create your resources .
Network Security Group (NSG): The name of Azure security group to manage access rules for SOSS-related resources (you have the option to use an existing NSG or create a new one by clicking
Create New...).Virtual Network (VNet): Name of the virtual network to be used by ScaleOut StateServer store (you can use an existing VNet or create a new one by clicking
Create New...).Virtual Network Address Range: Virtual Network address range. Default value is 10.10.0.0/16.
Deployment Subnet: The CIDR notation of the subnet where the SOSS VM instances will be running.
Client App Subnet: The CIDR notation of the client subnet where the client App Service code can run in.
Note
For many of these resources, you may either select an existing resource or create a new one. A new resource can be created explicitly by selecting Create New..., or implicitly by accepting a proposed resource name that includes the “(new)” suffix.
The “(new)” suffix indicates that the resource does not currently exist but will be created as part of the deployment, using the same name without the “(new)” suffix.
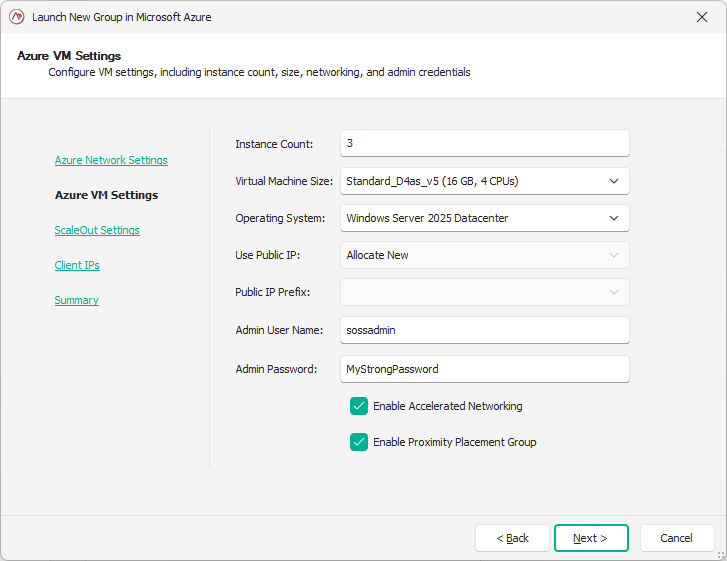
In the second page of the wizard, you can customize the Azure VM settings:
Instance Count: the initial number of servers in your deployed cluster.
Virtual Machine Size: the type of VM that will be used for each server in your cluster.
Operating System: the OS that will be installed on each VM.
Use Public IP: Specifies whether ScaleSet VM instances should utilize public IPs and, if so, how to allocate them.
Public IP Prefix: The name of existing Public IP Prefix (PIP) resource. It is only required when the Public IP Usage value is set to
Allocate From PIPPrefix.Admin User Name and Password: the credentials to be used for the local administrator on each VM.
Enable Accelerated Networking: If set to true (default), improves the networking performance by allowing network traffic to bypass the host, which reduces latency and CPU usage.
Proximity Placement Group: Indicates whether to use Proximity Placement Group for ScaleOut VM scale set.
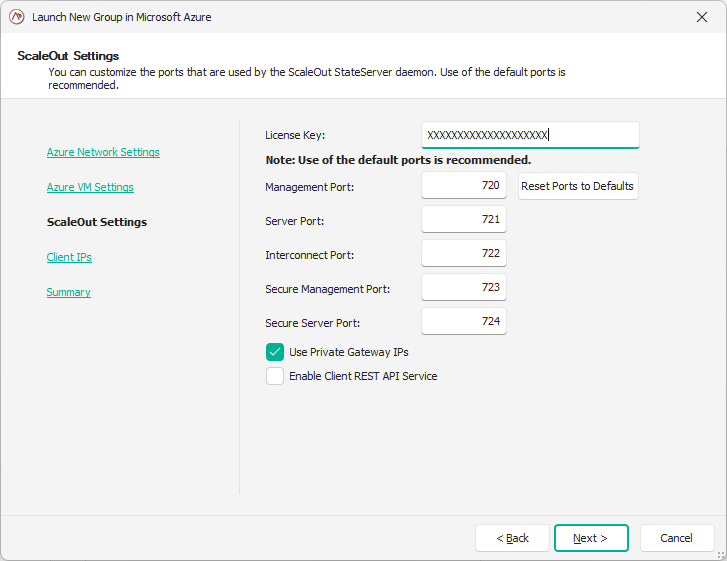
In the third page of the wizard, select the parameters of your ScaleOut cluster.
License Key: the ScaleOut license key that you obtained from our sales team.
Ports: the different ports used by the ScaleOut hosts for communication and management. Defaults are ports 720-724.
Private Gateway IPs: if set to true (recommended), the ScaleOut service will be configured to use private IPs host gateways. This means your application must run in the same virtual network as the ScaleOut hosts. You can use Azure VNet integration to achieve this. (For more information, see the Connecting a client application to the ScaleOut cluster section.) To use public IPs for gateways, uncheck the box and make sure the public IP Usage parameter is set to
Allocate NeworAllocate From PIPPrefix.
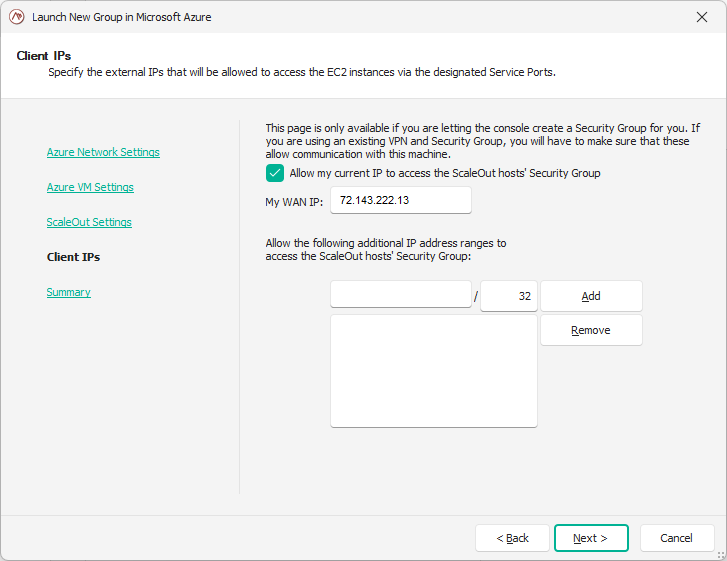
On the fourth page of the wizard, you can add exceptions to the network security group to allow your current machine to access the cluster (and VNet). You can also add additional IP addresses or ranges to enable access to services running on ScaleOut hosts.
On the last page of the wizard, you will pick a store name, and review all the parameters that you picked in the previous pages.
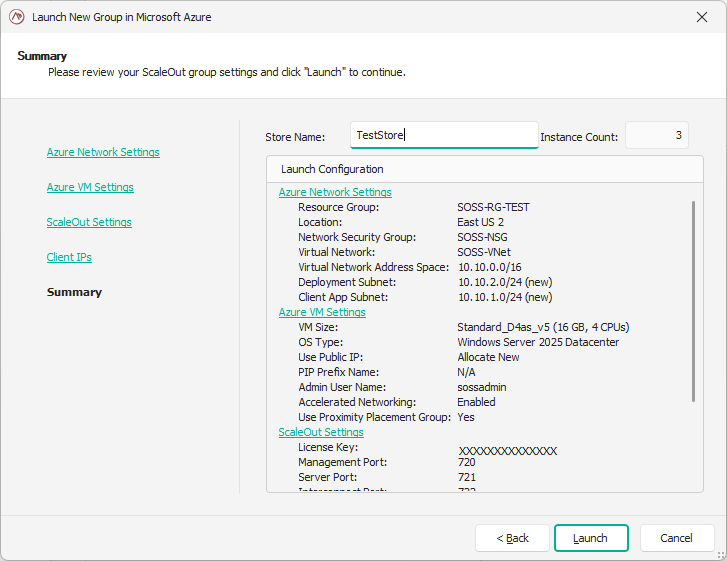
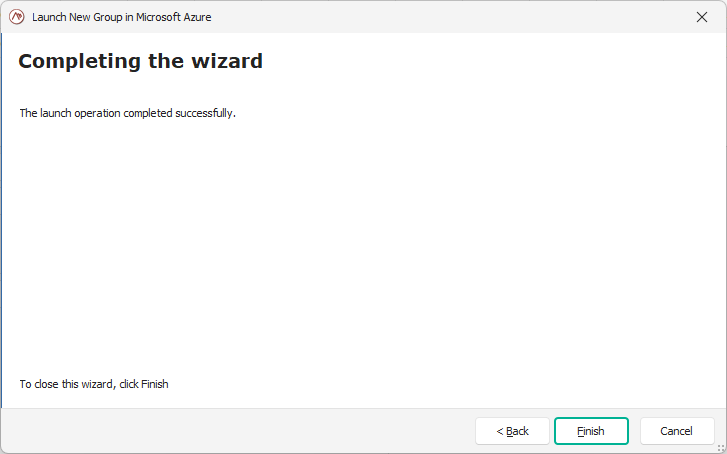
Once you are satisfied with the parameters, click on Launch to initiate the deployment of your store.
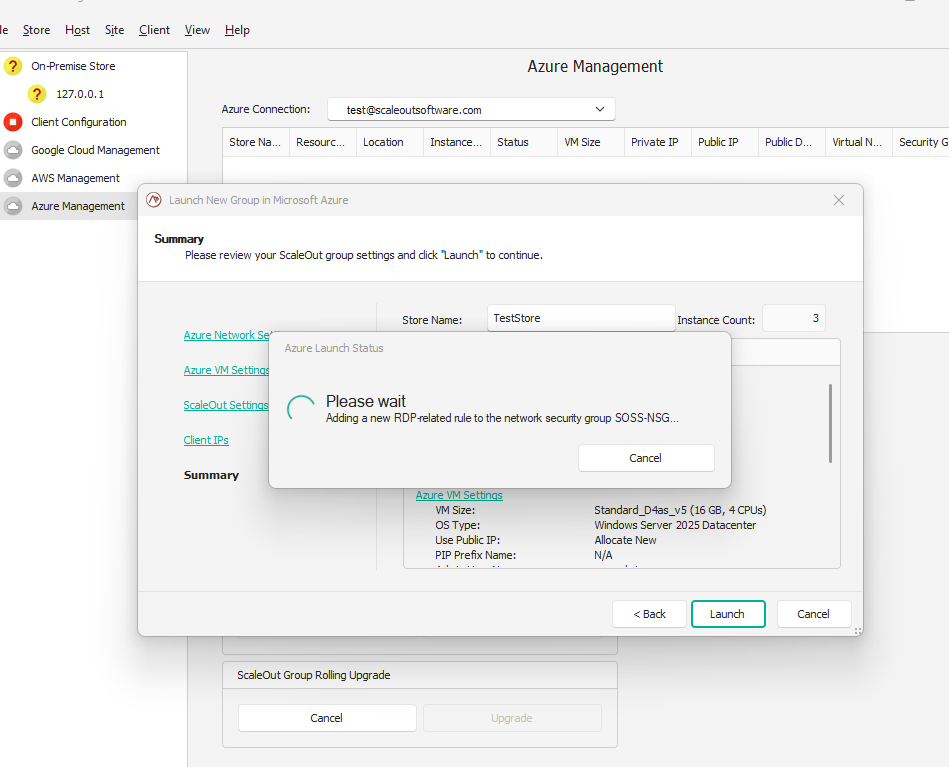
The creation of the store may take 5-7 minutes.

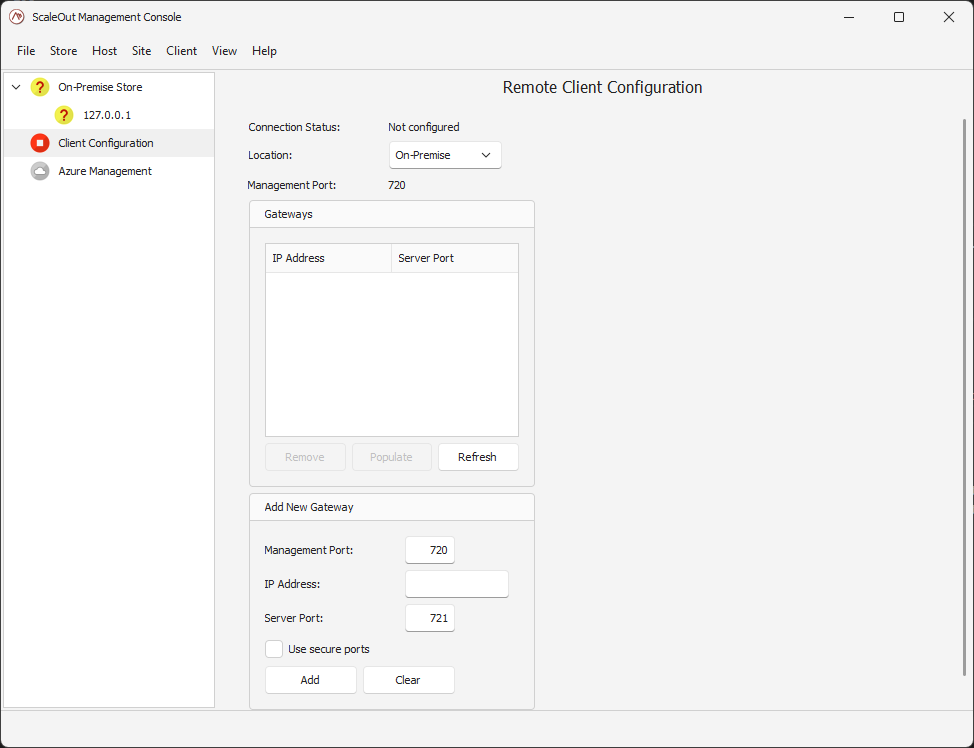
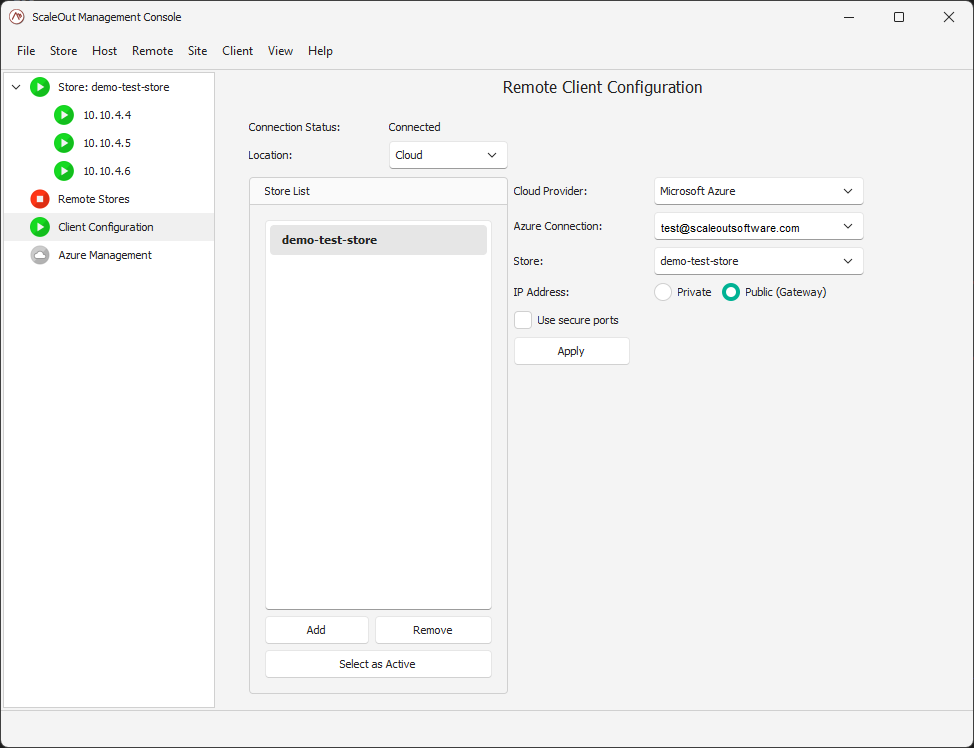
Configure the remote client
After the new store has been deployed, you can configure the remote client parameters to establish a connection to it. You can do so by opening the Client Configuration view located in the left pane of the Console.
This configuration will also enable the Console to manage the ScaleOut hosts within your new deployment.
There you can select the Cloud in the location drop-down box. This will reveal the Cloud provider options. Pick Microsoft Azure in the Cloud Provider drop-down, and the active
Azure connection you have created your store in.
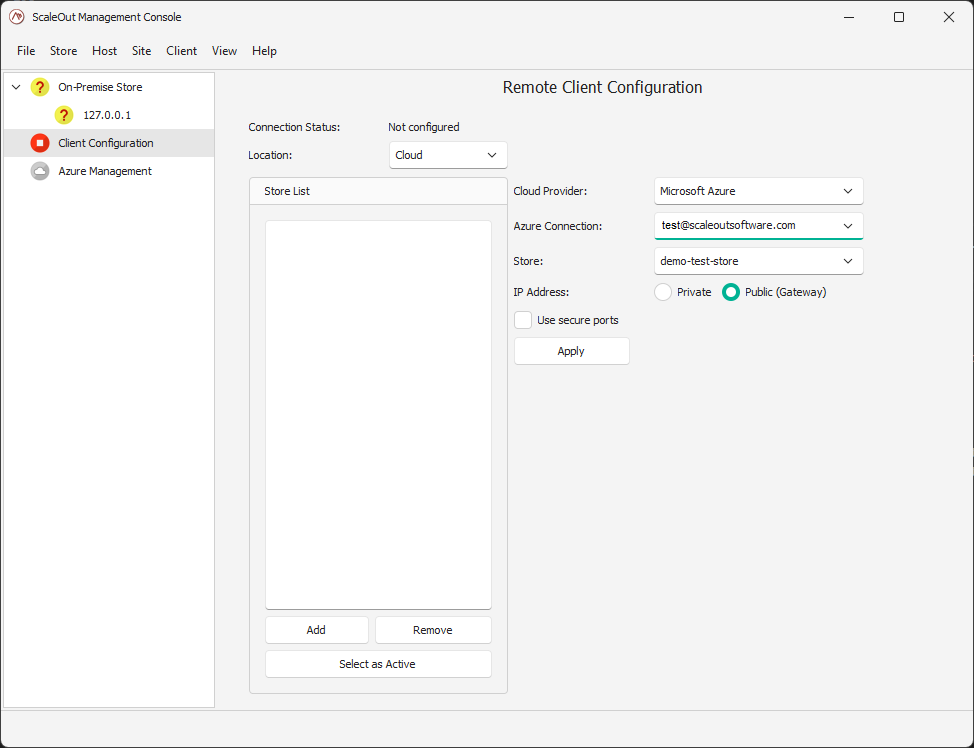
If you have multiple stores deployed in your Azure subscription, you can choose which one your client should use from the Store drop-down list. Click Apply to add the selected store to the remote client configuration.
Click Select as Active if you want to make this store the active remote client configuration.
You will see the update in the left pane as the store is now appearing:
Managing the store
In the Azure Management view, you can see details about the existing stores for a given connection. You can see details of each instance, or reboot them.
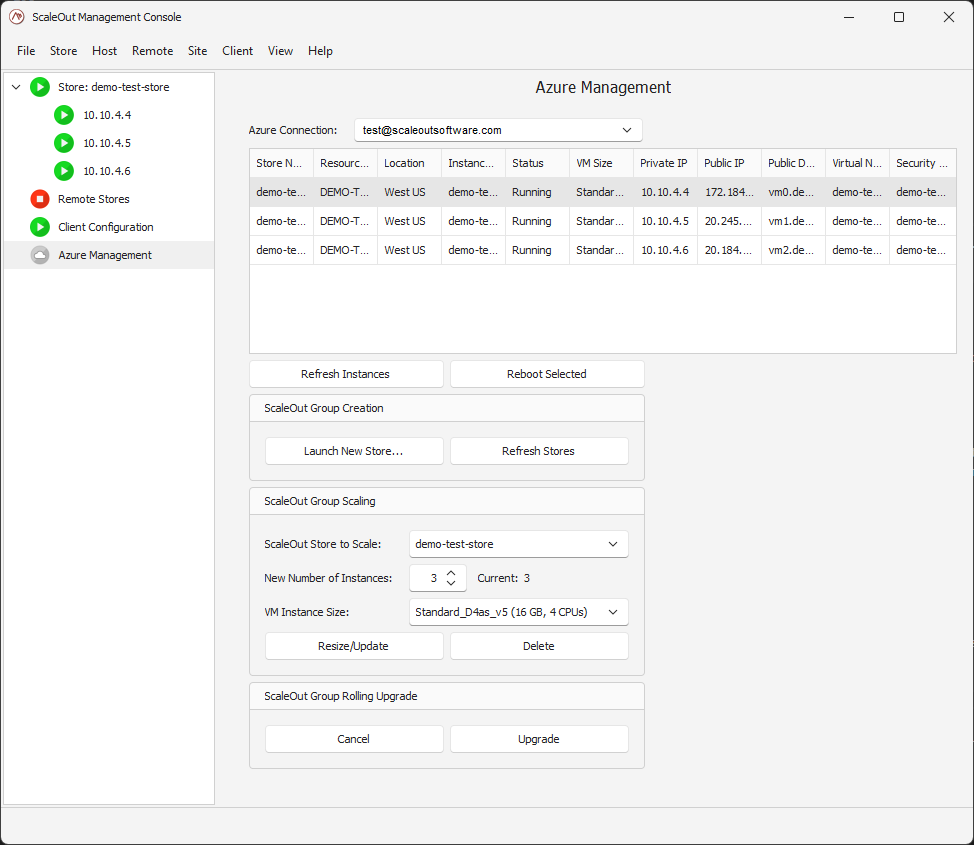
You can also perform the following management operations:
Resize the store by updating the size to its new value and clicking ‘Resize Store’. The Azure Platform will automatically pick instances to add or remove to match the new size.
Change the Azure VM instance size.
Delete the entire store.
Perform a rolling upgrade to the latest version of ScaleOut.
Connecting you Client App to the Azure Store
If you deployed your Azure store using the Microsoft Entra ID, it is simple to write code in your client application to access the store.
using Scaleout.Client;
using Scaleout.Client.Azure;
using System.Security.Cryptography.X509Certificates;

namespace MyApp
{
   internal class Program
   {
      static void Main(string[] args)
      {
            // Path to the private cert .pfx file that corresponds to the public cert you uploaded to Azure
            var certPath = "TestCert.pfx";

            // Password for the .pfx file (if it has one, otherwise use null or string.Empty)
            var certPassword = "MyCertP@ssw0rd!";

            X509Certificate2 cert = new X509Certificate2(certPath, certPassword,
               X509KeyStorageFlags.MachineKeySet | X509KeyStorageFlags.Exportable);

            var azureProv = new AzureBootstrapGatewayProvider(
                              tenantId: "0348ce21-3f1a-4723-a569-d397237284c6",
                              clientId: "595c6594-4788-4e2a-b436-4bd12052ae42",
                              certificate: cert,
                              scaleoutStoreName: "demo-test-store",
                              gatewayType: GatewayType.Public);

            string connectionString = "useSecure=false;maxPoolsize=16";

            var conn = GridConnection.Connect(connectionString, azureProv);
            var cacheBuilder = new CacheBuilder<string, string>("My Cache", conn);
            var cache = cacheBuilder.Build();

            // Do what you need with the cache
            cache.Add("myTestKey", "myTestValue");
      }
   }
}
Deploying Store in Azure using ARM Templates
Prerequisites
- Azure subscription
To deploy ScaleOut StateServer (SOSS) in a Microsoft Microsoft Azure environment, begin by visiting https://azure.microsoft.com/ and signing up for a Microsoft Azure subscription.
- Azure CLI
ScaleOut StateServer is deployed to Azure as a set of virtual machines running as a VMSS resource. It can be deployed from a local on-premises computer. This machine needs to have Azure CLI installed. You can install the Azure CLI on Linux, macOS, or Windows computers. For downloading and installing Azure CLI, please visit the How to install the Azure CLI page.
- PowerShell 5.1 (optional)
PowerShell 5.1 is included with Windows 10 and Windows Server 2016. For other operating systems, you can download and install PowerShell 5.1 from the PowerShell 5.1 download page.
- Required Azure Permissions
To deploy a StateServer cluster to Azure, you need access to all operations on the Microsoft.Resources/deployments resource type and the write access on the following deployed resources:
Microsoft.Resources/deployments/*
Microsoft.Network/virtualNetworks/write
Microsoft.Network/virtualNetworks/subnets/write
Microsoft.Network/networkSecurityGroups/write
Microsoft.Compute/virtualMachineScaleSets/write
Microsoft.Storage/storageAccounts/write
Microsoft.Compute/proximityPlacementGroups/write
For a list of roles and permissions, see Azure built-in roles.
The deployment package consists of two sets of files, local and remote. The local files are used by the administrators or DevOps engineers to deploy and manage ScaleOut clusters in their Azure subscription from a local on-premises machine. These files are located in the ScaleOut StateServer installation directory under the “Cloud/Azure” subfolder. You can also download them as a separate zip package from the ScaleOut Software’s website here. The remote files are used by the Azure cloud deployment process and are hosted by ScaleOut Software with public read access permissions.
Local files:
soss_deployment_arm_template.json
soss_deployment_arm_template.parameters.json
DeploySOSSAz.ps1
RemoveSOSSAz.ps1
UpgradeSOSSAz.ps1
Remote files:
CreateVMSS.json
SetUpRBAC.json
ConfigureScaleSetInstance.ps1
SOSS MSI installer
Azure Watchdog MSI installer
Deployment Parameters
The following table lists all deployment-related parameters that can be set in the soss_deployment.parameters.json file:
Parameter Name |
Type |
Description |
Default Value |
Required? |
resourceGroup |
string |
The name of the Azure resource group where the ScaleOut StateServer store will be deployed together with other resources, such as virtual network, security group, etc. |
SOSS-RG |
No |
location |
string |
Region in Azure where a new ScaleOut StateServer store needs to be deployed. |
(for example, WestUS) |
Yes |
deploymentName |
string |
A short deployment (store) name, e.g. TestDeployment, SOSSStore, etc. |
SOSSStore |
No |
WindowsServerImageSku |
string |
Specifies the Windows Server image sku. Allowed values: 2016-Datacenter, 2019-Datacenter, 2022-Datacenter, 2025-Datacenter. The default value is 2025-Datacenter. |
2025-Datacenter |
No |
virtualNetworkName |
string |
Name of the virtual network to be used by ScaleOut StateServer store. If it does not exist in the specified Azure resource group, it will be created with the specified default value. |
SOSS-VNet |
No |
virtualNetworkAddress |
string |
Virtual Network address range. If empty, default value is 10.10.0.0/16. |
10.10.0.0/16 |
No |
clientAppSubnet |
string |
The CIDR notation of the client subnet where the client App Service code can be running in. |
10.10.1.0/24 |
No |
deploymentSubnet |
string |
The CIDR notation of a new subnet where the SOSS VM instances will be running. |
10.10.2.0/16 |
No |
networkSecurityGroupName |
string |
The name of Azure security group to manage access rules for SOSS-related resources. If it does not exist, it will be created with the default name SOSS-NSG. |
SOSS-NSG |
No |
vmSize |
string |
The size of the ScaleOut StateServer VM instance to create. If not specified, the Standard_D4as_v5 size will be used. |
Standard_D4as_v5 |
No |
numberOfSOSSInstances |
int |
The number of ScaleOut StateServer VM instances in the cluster’s scale set. |
2 |
No |
useProximityPlacementGroup |
bool |
Indicates whether to use Proximity Placement Group for ScaleOut VM scale set. |
true |
No |
adminUsername |
string |
The admin-level user’s name for each scale set VM instance that runs SOSS service. |
sossadmin |
No |
adminPassword |
string |
The password for the admin-level user account for each scale set VM instance that runs SOSS service. |
Yes |
|
publicIPUsage |
string enum |
Specifies whether ScaleSet VM instances should utilize public IPs and, if so, how to allocate them. Allowed values: DoNotUse, AllocateNew, AllocateFromPIPPrefix. |
AllocateNew |
No |
PIPPrefixName |
string |
The name of existing Public IP Prefix (PIP) resource. It is only required when the PublicIPUsage value is set to AllocateFromPIPPrefix. |
MyPIPPrefix |
No |
usePrivateGateway |
bool |
if set to true (recommended), ScaleOut StateServer will be configured to use private IPs for hosts gateways. To use public IPs for gateways, it needs to be set to false and publicIPUsage parameter should also be set to AllocateNew or AllocateFromPIPPrefix. |
true |
No |
artifactsPublicUrl |
string |
The public URL for the location where remote deployment files are hosted (linked ARM templates, SOSS installer and VM start-up script). Set to “” for customized deployment scenario when all remote deployment files are hosted in a customer’s environment. |
https://www. scaleoutsoftware.com/ pkg/azure_artifacts |
No |
sossInstallerFileName |
string |
The name of the SOSS installer file to deploy. |
soss_setup64.msi |
No |
sossLicenseKey |
string |
The license key for ScaleOut StateServer instances in the corresponding scale set. |
Yes |
|
sossPorts |
string |
The range of TCP ports to be used by SOSS (e.g. 720-724). |
720-724 |
No |
enableAcceleratedNetworking |
bool |
If set to true (default), improves the networking performance by allowing network traffic to bypass the host, which reduces latency and CPU usage. |
true |
No |
enableClientRestService |
bool |
If set to true (default value is false) SOSS is configured to automatically start the Client REST Service when the VM starts. By default, the service listens for client requests on TCP port 4001. |
false |
No |
installLatestSOSSVersion |
bool |
If set to true (default), the script will download and install the latest version of StateServer from scaleoutsoftware.com. |
true |
No |
priorityOrderForNSGRules |
int |
The priority order level for SOSS deployment-related security rules, e.g. 200, or 300, etc. |
200 |
No |
artifactsResourceGroup |
string |
Only for advanced customized deployments The name of the Azure resource group where deployment artifacts storage account is located. All remote deployment files should be hosted in a customer’s Azure environment. |
“” |
No |
artifactsStorageAccountName |
string |
Only for advanced customized deployments The name of the Azure storage account where deployment artifacts are located. |
“” |
No |
artifactsContainerName |
string |
Only for advanced customized deployments The name of the Azure BLOB container where remote deployment files (SOSS installer, the startup script, ARM templates) are located. |
“” |
No |
deploymentUniqueId |
string |
A unique deployment identifier to combine all deployment-related resources together. |
utcNow(‘yyyy-MM-dd’) |
No |
Deploying a new ScaleOut cluster
Open a command prompt window and set the current directory to the location where ScaleOut StateServer deployment files are located.
Set desired values for all deployment-related parameters in the soss_deployment.parameters.json configuration file.
Run the powershell script file DeploySOSSAz.ps1. The script file has no parameters, but it uses many deployment configuration parameters from the soss_deployment.parameters.json file.
Example:
[path to folder]/>.\DeploySOSSAz.ps1
Upgrading an existing ScaleOut cluster
Open a command prompt window and set the current directory to the location where ScaleOut StateServer deployment files are located.
Run the powershell script file UpgradeSOSSAz.ps1. The script file has 1 optional parameter:
The flag that indicates whether to download and install the latest version of StateServer. If set to “true”, the script will download and install the latest version of SOSS from scaleoutsoftware.com. Otherwise, the target SOSS installer will be obtained either from the public URL or the Azure storage account specified in the soss_deployment.parameters.json configuration file.
The script also uses other deployment configuration parameters from the local soss_deployment.parameters.json configuration file.
Run the powershell script file UpgradeSOSSAz.ps1.
Example:
[path to folder]/>.\UpgradeSOSSAz.ps1
Deleting a ScaleOut cluster
Open a command prompt window and set the current directory to the location where ScaleOut StateServer deployment files are located.
Run the powershell script file RemoveSOSSAz.ps1. The script file has 5 optional parameters:
The name of SOSS deployment that needs to be removed.
Unique deployment identifier.
Azure Resource Group where ScaleOut StateServer store is running.
Short deployment name that was used when the store was deployed.
Unique deployment identifier that was used when the store was deployed.
If no arguments are specified, the parameters’ values will be retrieved from the local soss_deployment.parameters.json configuration file.
Run the powershell script file RemoveSOSSAz.ps1.
Example:
[path to folder]/>.\RemoveSOSSAz.ps1
Connecting a client application to the ScaleOut cluster
Depending on the deployment parameters that were used to deploy the ScaleOut StateServer cluster, you can connect your client applications using public or private ScaleOut VM IP addresses. If your application is running in Azure as an App Service, we recommend using the virtual network integration (VNet integration) feature to connect using the ScaleOut cluster’s private IPs. When a ScaleOut cluster is deployed, you have a choice of creating a new Azure virtual network or using an existing one, where ScaleOut-related scale set VMs need to be running in a dedicated subnet (defined by the deploymentSubnet parameter above). Using a VNet integration will allow your Azure App Service run in the same virtual network where ScaleOut StateServer is deployed, enabling your application to access the cluster via private IPs. The name of the subnet where the App Service application is planning to run should be defined via the clientAppSubnet deployment parameter above.
There are 2 ways to connect a client App Service application to the ScaleOut cluster in Azure:
Using private IPs for ScaleOut VMs and App Service with VNet integration: In this scenario, the ScaleOut store is configured to expose private IPs to applications to connect, and a client App Service is configured to run in a dedicated clientAppSubnet of the same virtual network that is used by the ScaleOut store.
- Deployment considerations:
The name of the virtual network should be specified via the virtualNetworkName parameter. You can either use an existing virtual network for the deployment or specify the name of a new virtual network. If the virtual network referenced via the virtualNetworkName parameter does not exist, it will be created in the specified Azure resource group.
The virtual network address range should be specified via the virtualNetworkAddress parameter.
The subnet where ScaleOut VM instances will be running should be specified via the deploymentSubnet parameter.
The name of the client application subnet should be specified via the clientAppSubnet parameter.
The usePrivateGateway parameter should be set to true.
By using the Azure VNet integration feature, the client App Service needs to be configured to run in the same virtual network where the ScaleOut hosts are deployed. To learn how to enable virtual network integration for App Service, please read the Azure App Service documentation.
Using public IPs for ScaleOut VMs: In this scenario, ScaleOut VMs are configured to expose public IPs to client applications by setting the usePrivateGateway deployment parameter to false. The App Service client applications will be accessing the ScaleOut store via their hosts’ public IPs. Using public IPs for connecting to ScaleOut VMs is not recommended for production environments since the data transfer between your applications and ScaleOut cluster might incur some additional costs.
- Deployment considerations:
You can either use an existing Azure virtual network or let the deployment script create a new one. The name of the virtual network should be specified via the virtualNetworkName parameter.
The virtual network address range should be specified via the virtualNetworkAddress parameter.
The subnet where ScaleOut VM instances will be running should be specified via the deploymentSubnet parameter.
The usePrivateGateway parameter should be set to false.
Regardless of how your application is going to connect to the ScaleOut cluster, we recommend allocating a public IP address for each ScaleOut host to enable remote management and monitoring of the cluster. To allocate a new public IP, set the publicIPUsage parameter to AllocateNew or AllocateFromPIPPrefix. If AllocateFromPIPPrefix is used, specify the name of the existing Public IP Prefix Azure resource via the PIPPrefixName parameter.
Registering an Application in Microsoft Entra ID
The Role of App Registration in Microsoft Entra ID
Identity for the Application
In the same way people have user accounts, applications also need an identity to log in. The app registration gives your application a Client ID (public identifier) and allows you to configure how it will authenticate (secret, certificate, etc.).
Authentication
Defines how the application proves its identity when talking to Microsoft Entra ID.
Options include:
Client secret
Certificate (more secure)
Managed identity (if running in Azure)
Redirect URIs & Protocols
Defines where tokens are sent after authentication.
For example, desktop/native application might select https://login.microsoftonline.com/common/oauth2/nativeclient, where web apps can configure the HTTPS URL endpoint specific to the application.
This ensures tokens are only delivered to trusted endpoints.
Multi-Tenant vs. Single-Tenant Control
Decide whether only accounts from your tenant can sign in (single-tenant), or accounts from any Entra tenant (multi-tenant), including personal Microsoft accounts.
Secure Token Issuance
Once the app is registered, Microsoft Entra can issue OAuth2 or OpenID Connect tokens to it. These tokens are used to access resources securely (Azure services, custom APIs, etc.).
How to Create an App Registration Using Azure Portal
Create an App Registration
Go to Azure Portal and search for Microsoft Entra ID.
In the left menu, select App registrations and click New registration.
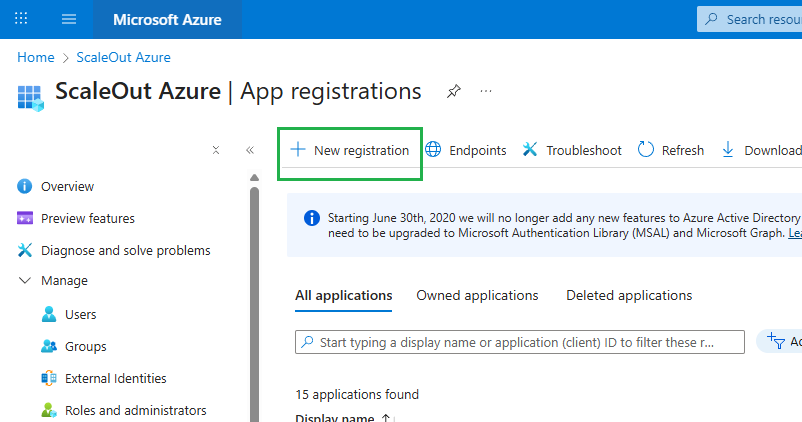
Fill in the form:
For the Name value, we suggest using
scaleout-management-identity.For Supported account types, select
Accounts in any organizational directory (Any Azure AD tenant - multitenant). This allows users from any Entra tenant to sign in. There are 3 other choices as well, including a multitenant option with support for personal Microsoft accounts (live.com or outlook.com).Redirect URI (optional): leave it blank for now; we’ll add it later.
Click
Register.
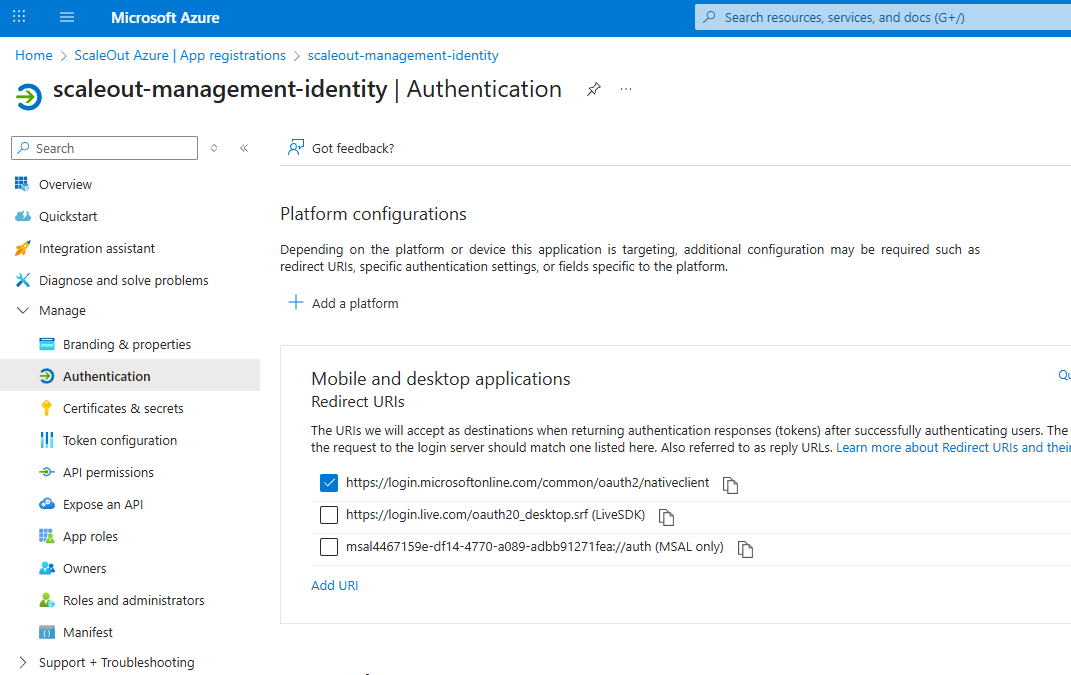
Configure Authentication
After creating application registration above, open the app and go to
Authentication.Under Platform configurations, click
Add a platform.Select
Desktop application.
In the redirect URI dialog choose Configure Desktop + devices.
A suggested redirect URI like
https://login.microsoftonline.com/common/oauth2/nativeclientwill appear.Accept this as it is the standard for desktop/native apps.
Save changes.
Upload certificate
This is where you can specify a certificate that will be used later by ScaleOut client library within your application. Any SSL certificate using RSA encryption can be used.
Go to
Certificates & secretsin the app registration.Under
Certificates, clickUpload certificate.Upload the public key part of your certificate (file must be .cer, .pem, or .crt). This file should contain the public key only (not private).
Save.
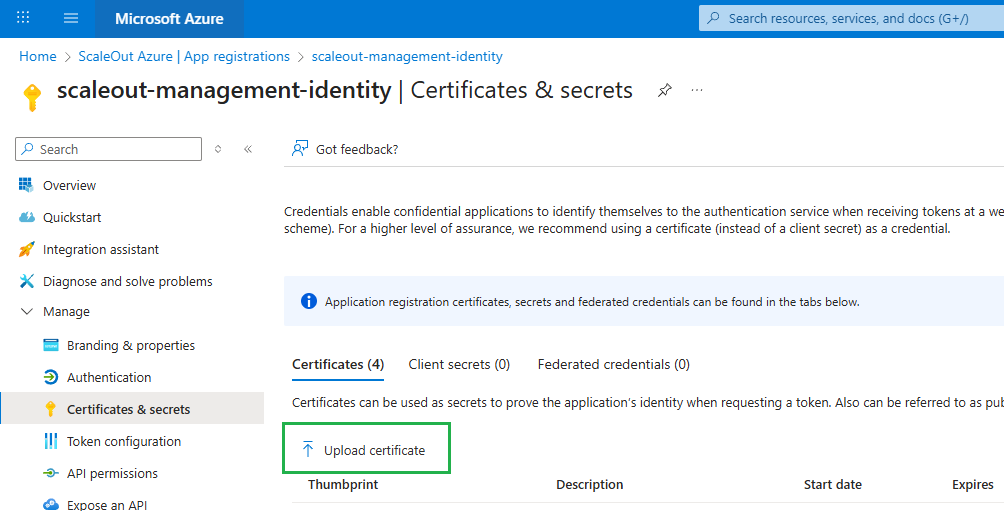
Entra will now trust this certificate when your app authenticates.
Note
Role of the Certificate
- The certificate is used by the client application to prove its identity when requesting tokens from Entra.
Public key is stored in Entra (what Azure trusts).
Private key stays securely with your application (in the .pfx or .key file, Azure Key Vault, certificate store, etc.).
During login, ScaleOut client library signs a token with the private key and Microsoft Entra validates it against the uploaded public key. This makes it much more secure than using a client secret string.
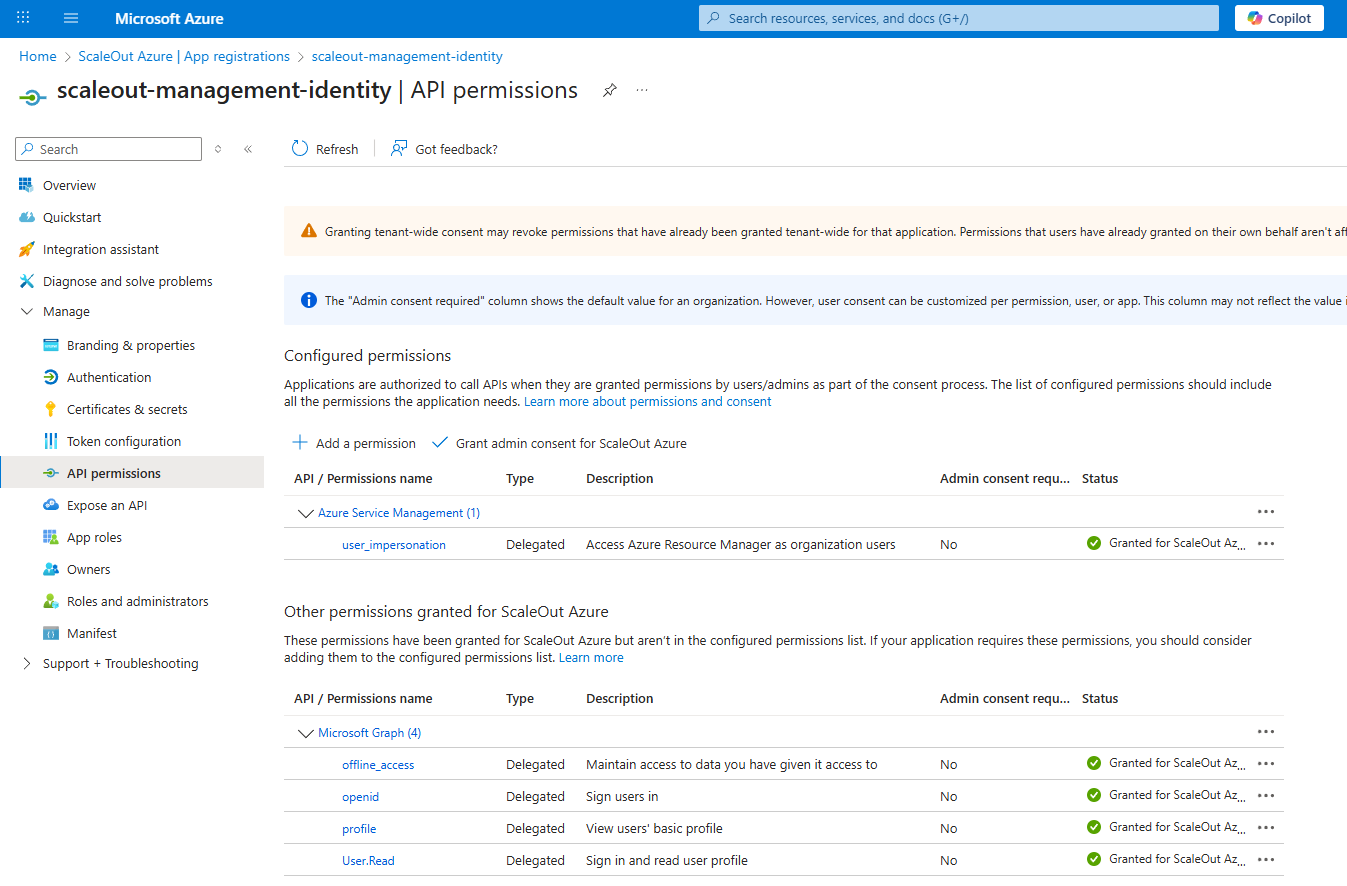
Configure API Permissions
Go to
API permissionsand clickAdd a permission.Select
Azure Service Management.Select the
user_impersonationpermission, if necessary, clickGrant admin consent.Click
Add permissionsbutton at the bottom of the screen.
Assign a Reader role to an App Registration
Registering an app in Entra ID only gives it an identity in your tenant, it does not grant access to any Azure resources (subscriptions, resource groups, or resources). Your app at this point can only authenticate and get tokens from Azure AD. Without a role assignment, it cannot read, write, or manage anything in your subscription. The Reader role is a built-in Azure RBAC role that provides read access to subscription resources.
To assign a Reader role:
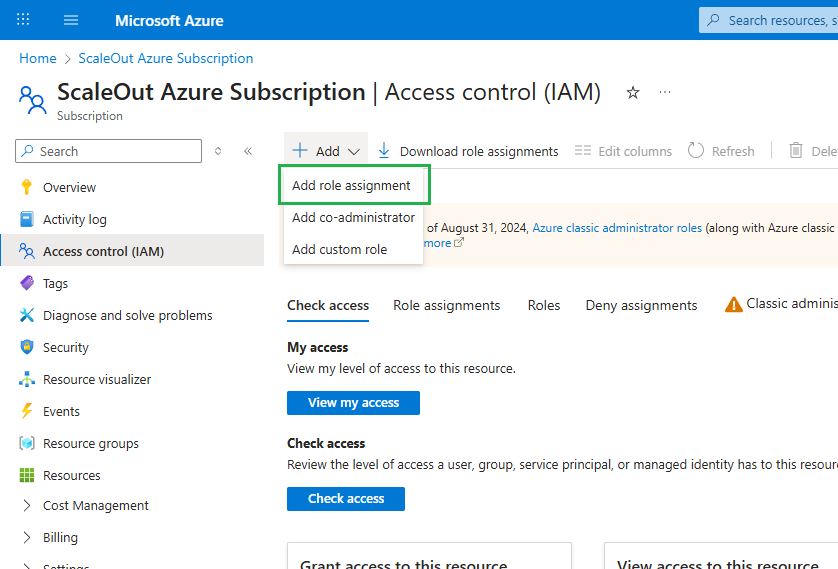
Go to the
Azure Portal->Subscriptions.Select your subscription.
In the left menu, select
Access control (IAM).Click
Add->Add role assignment.
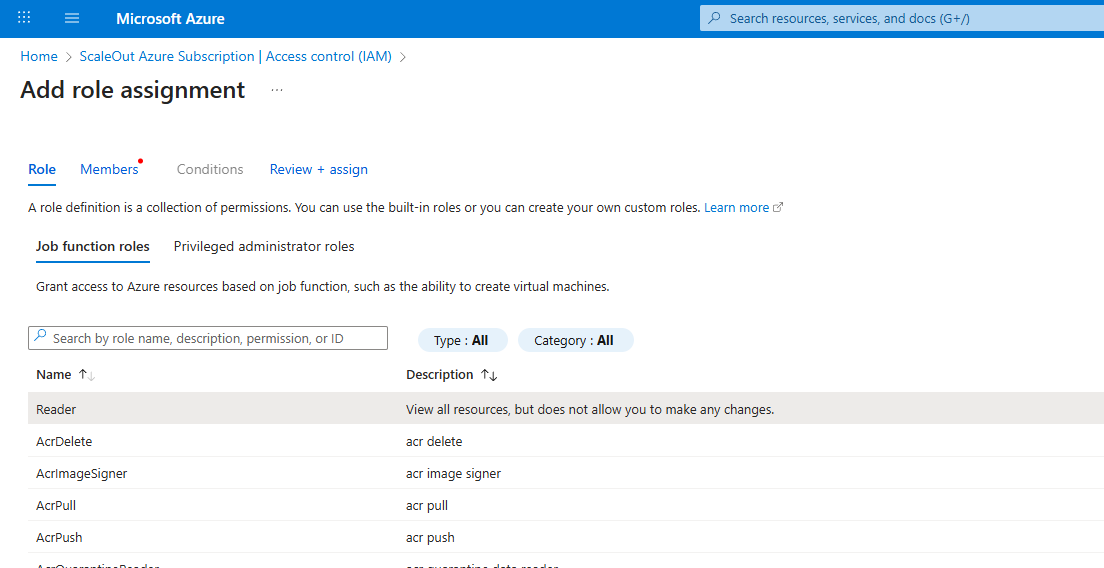
In the Role tab, choose
Readerand clickNext.
In the Members tab:
Select
Assign access to->User, group, or service principal.Click
Select members.
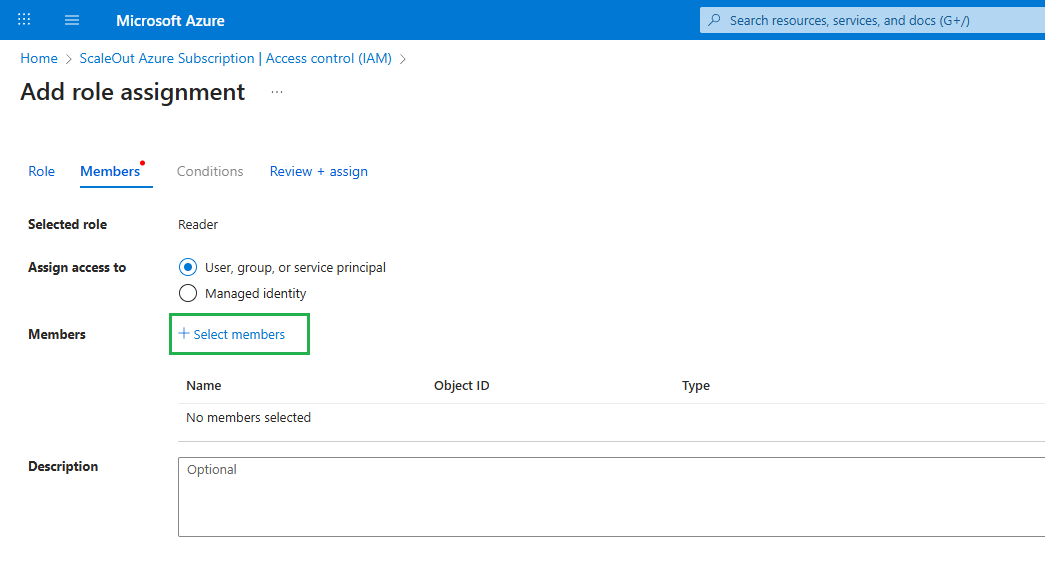
Search for your App Registration name (not the App ID string). Use the fulle app name (e.g.
scaleout-management-identity).Pick it and click
Select.Click
Review + assign.
How to Create an App Registration Using Azure CLI
If you prefer, you can do everything we just described for the Azure Portal (in the previous section) from the Azure CLI instead.
Create a client application registration
Use the following CLI command to create a confidential client application registration:
$appId = az ad app create `
--display-name 'scaleout-management-identity' `
--public-client-redirect-uris https://login.microsoftonline.com/common/oauth2/nativeclient `
--sign-in-audience AzureADandPersonalMicrosoftAccount `
--query appId `
--output tsv
Note
you can choose a different value for the sign-in-audience property. The choices are:
AzureADMyOrg (for accounts in this organizational directory only).
AzureADMultipleOrgs (for accounts in any organizational directory).
AzureADandPersonalMicrosoftAccount (for accounts in any organizational directory and personal Microsoft accounts).
PersonalMicrosoftAccount (personal Microsoft accounts only).
Obtain Application ID
Display the ApplicationId (or ClientId), copy it, you will need it later when you will configure connection to Azure within ScaleOut Management Console.
Write-Host $appId
Upload certificate
az ad app credential reset `
--id $appId `
--cert ".\myapp-cert.cer" `
--append
Note
myapp-cert.cer is a public key of the certificate that you will be using within your application for accessing a ScaleOut cluster in Azure.
Configure API Permissions
Here we need to grant your app the Azure Service Management API->user_impersonation delegated permission. This is a required permission apps need if they’re going to call the Azure Resource Manager API on behalf of a signed-in user.
To do that, run the following script snippet (PowerShell friendly):
$rra="[{\""resourceAppId\"":\""797f4846-ba00-4fd7-ba43-dac1f8f63013\"",\""resourceAccess\"":[{\""id\"":\""41094075-9dad-400e-a0bd-54e686782033\"",\""type\"":\""Scope\""}]}]"
az ad app update --id $appId --required-resource-accesses $rra
797f4846-ba00-4fd7-ba43-dac1f8f63013is a fixed resource app for the Azure Service Management (a.k.a. Azure Service Management API).41094075-9dad-400e-a0bd-54e686782033is a known ID for delegated permission user_impersonation
If your organization’s policy requires granting admin consent to all permissions, here is the CLI command for that:
az ad app permission grant --id $appId --api "797f4846-ba00-4fd7-ba43-dac1f8f63013"
Assign a Reader role to an App Registration
To do that, you need to know your Azure subscription Id. You can get it on subscription page of Azure Portal or get it in the output of the “az login” CLI command.
@subscriptionId="XXX"
az role assignment create --assignee $appId --role "Reader" --scope "/subscriptions/$subscriptionId"