Defining a Model
Overview of a Real-Time Digital Twin Model
A real-time digital twin model defines:
State data (called properties) to be tracked for each type of data source (for example, a wind turbine).
A set of actions for processing incoming event messages from the data source, updating state data, and sending messages and alerts.
The ScaleOut Digital Twins™ service creates an instance of a digital twin model for each unique data source (for example, “wind turbine 17”). The runtime automatically handles the correlation of incoming events by data source, accessing state data from in-memory storage, and orchestrating message processing. This makes streaming analytics applications easy to write and achieves predictably high performance.
Machine Learning Models
Using the ScaleOut Model Development Tool, you can create a machine learning (ML) model that uses a machine learning algorithm to analyze numeric properties within both incoming messages and state data for spikes, unexpected trend changes, and anomalies relative to historic values. This type of real-time digital twin model requires only properties to be defined; no code is required. You can configure your ML model to automatically respond by sending alerts sent to a configured alerting service and/or by posting events to a list. The Machine Learning overview topic describes ML concepts employed by the ScaleOut Model Development Tool.
Rules-Based Models
The tool also lets you create a rules-based model by defining a set of rules to run when each incoming message is received by a real-time digital twin instance. Rules operate on both message properties and state properties stored in the twin. They can be used to:
evaluate incoming messages,
analyze and record property changes using built-in functions,
create time-stamped event lists,
send messages back to the data source,
send messages to other real-time digital twin instances, and
send alerts to a configured alerting provider.
Rules-based real-time digital twins can easily track incoming messages by data source and maintain dynamic state information for each data source. ScaleOut’s rules engine was designed to be easy to use by analysts and engineers. Their functions implement many numeric and string operations on properties, as well as data aggregation operations on lists. They also allow ML functions to be seamlessly incorporated.
Once you have created a set of rules, you can test them within the ScaleOut Model Development Tool by sending messages and validating state changes. You also can single step through the rules to observe their behavior in detail.
Note
The rules engine runs independently within each real-time digital twin instance.
Common Model Elements
This section describes the basic components needed when creating either an ML or a rules-based model.
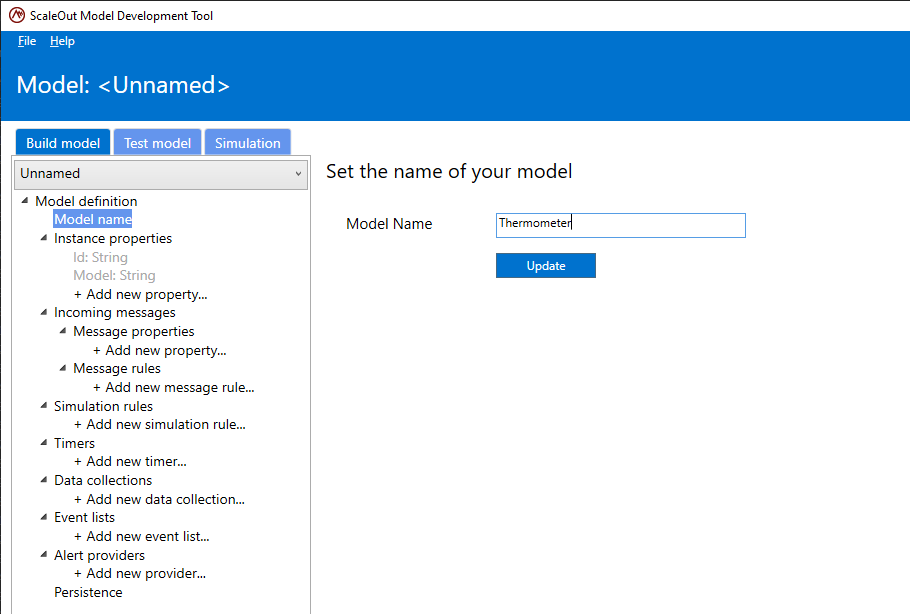
Model Name
All real-time digital twin models require a name. This name needs to be unique within an organization’s deployment.
To set or modify the model’s name, select the Model name. In the text field, enter the name of the model and click Update.
Data Types
Four different types are available to represent data stored within a real-time digital twin:
Number: whole-valued or decimal numbers (positive or negative)
String: a sequence of Unicode characters
Boolean: data type that has one of two possible values (true and false)
DateTimeString: a string representing a date and time, as described below
The format of a “DateTimeString” is any string that follows the ISO 8601 standard, for example:
“2021-03-22” (date only in local time zone)
“2021-03-22T18:21” (date with 24-hr time in local time zone)
“2021-03-22T18:21Z” (date and time in Zulu (GMT) time)
“2021-03-22T18:21-09:00” (date and time in PST time)
“2021-03-22 11:21 PM -09:00” (date and time in PST time in 12-hr time)
Instance Properties
Instance properties define the data to be maintained by an instance of a real-time digital twin for its corresponding data source. They are used to track and analyze the state a of data source, and they can be assigned values and accessed in rules. For example, a wind turbine model’s instance properties might include a property tracking the revolutions per minute (RPM) or temperature of internal components of the wind turbine.
Note
An instance property optionally can be assigned an initial value. Each new instance will be created with this initial value for the property.
Properties can be of any of the four types described above: Number, String, Boolean, or DateTimeString. To add a new property to your model, select Add a new property item in the tree under Instance properties. For example, the screenshot below shows an instance property named “Temperature” and of type Number being added.
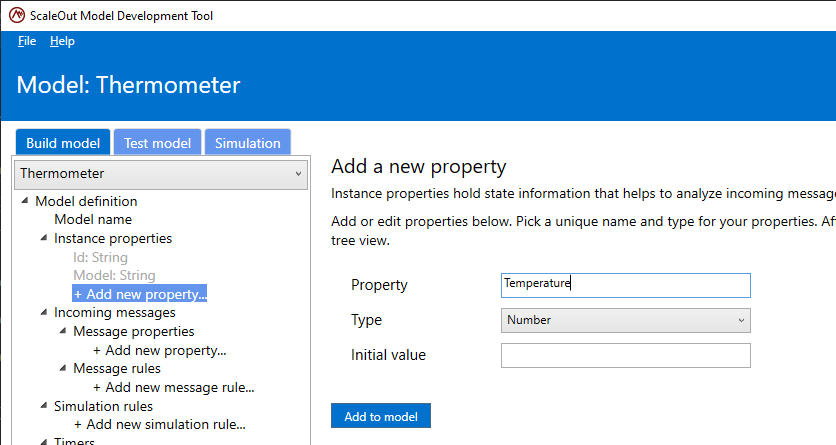
After clicking the Add button, the new property should appear in the tree view on the left:
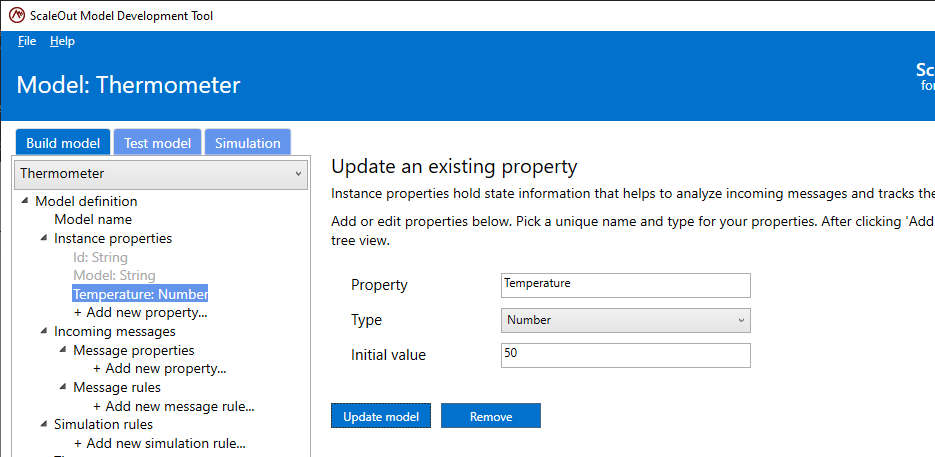
If the property needs to be updated, select the property in the tree view, update it in the right pane and click Update. Both the name and type can be changed. The updated property will be reflected in the tree view.
Note
There are two built-in instance properties: Id, the unique identifier of the current instance of the real-time digital twin model, and Model, the model’s name. Both properties are of type String. The Id property is set when the instance is created using the data source’s identifier, which is included in messages to the real-time digital twin instance.
Incoming Message Properties
Real-time digital twin instances receive messages from their data sources. The model needs to define the format of these messages by specifying which JSON-encoded properties the data source sends in each message. Message properties can be used in rules. For example, if the message contains a “Temperature” property, a rule could be written to take a specific action if the temperature is higher than a threshold.
To add an incoming message property, select Add a new property under Incoming message properties in the tree and then follow the same procedure described above for instance properties. A message property also can be updated in the same manner as instance properties.
Data Collections
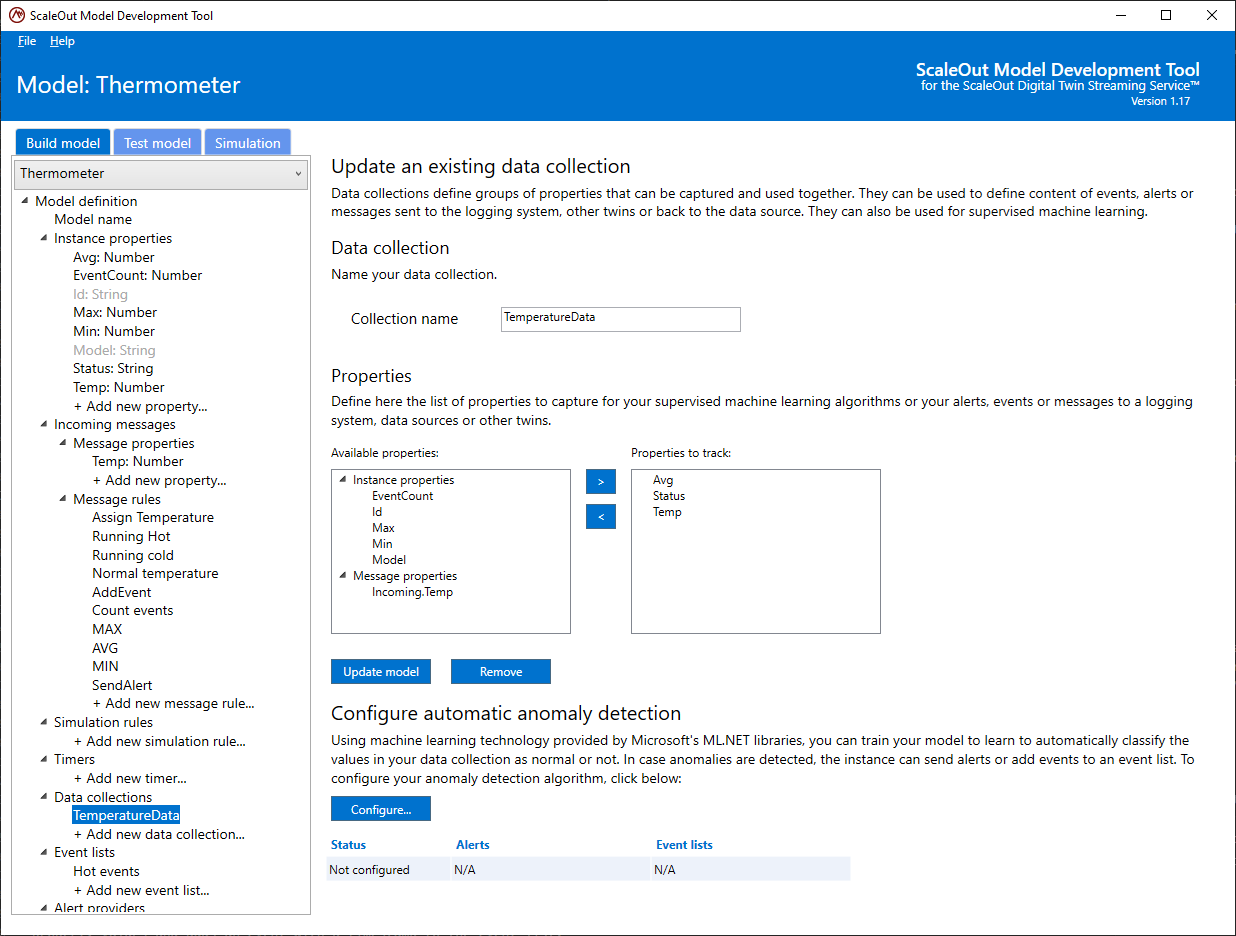
Data collections define groups of instance properties and or message properties whose values can be captured and recorded as a group. They can be used as a convenient way to describe the content to be saved in time-stamped events, alerts, or messages sent to the logging system or other real-time digital twins.
To create a new data collection, select Add a new data collection… under Data collections in the tree list. Choose a name for your data collection and then pick the instance or message properties to include in the collection. Finally, hit the Update model button to create the collection, as shown in the following screenshot:
You can edit a data collection by selecting it in the tree and then modifying it in the same manner that you created it.
Once you have created a data collection, you can use it to supply a group of property values to the following:
Events: When you specify an event to be created (for example, by an ML algorithm for anomaly detection or by using the ADD_EVENT function in a rule), the associated event list (described below) will capture the property values defined in a data collection.
Alerts: When calling the SEND_ALERT function, you provide the name of a data collection, and the alert will automatically include the values for all properties listed in the collection.
Functions: Some logging and message-sending functions use data collections to capture properties. For example, LOG_MESSAGE_WITH_DATA, SEND_TO_TWIN, and SEND_TO_DATASOURCE take data collections as parameters.
Event Lists
Event lists are used to capture events that represent important changes in property values. Each event records the current values of a specified data collection along with a timestamp. For example, if a real-time digital twin model is tracking telemetry from a weather station, it can capture events that record the current temperature and humidity when one of these measurements goes beyond a certain threshold.
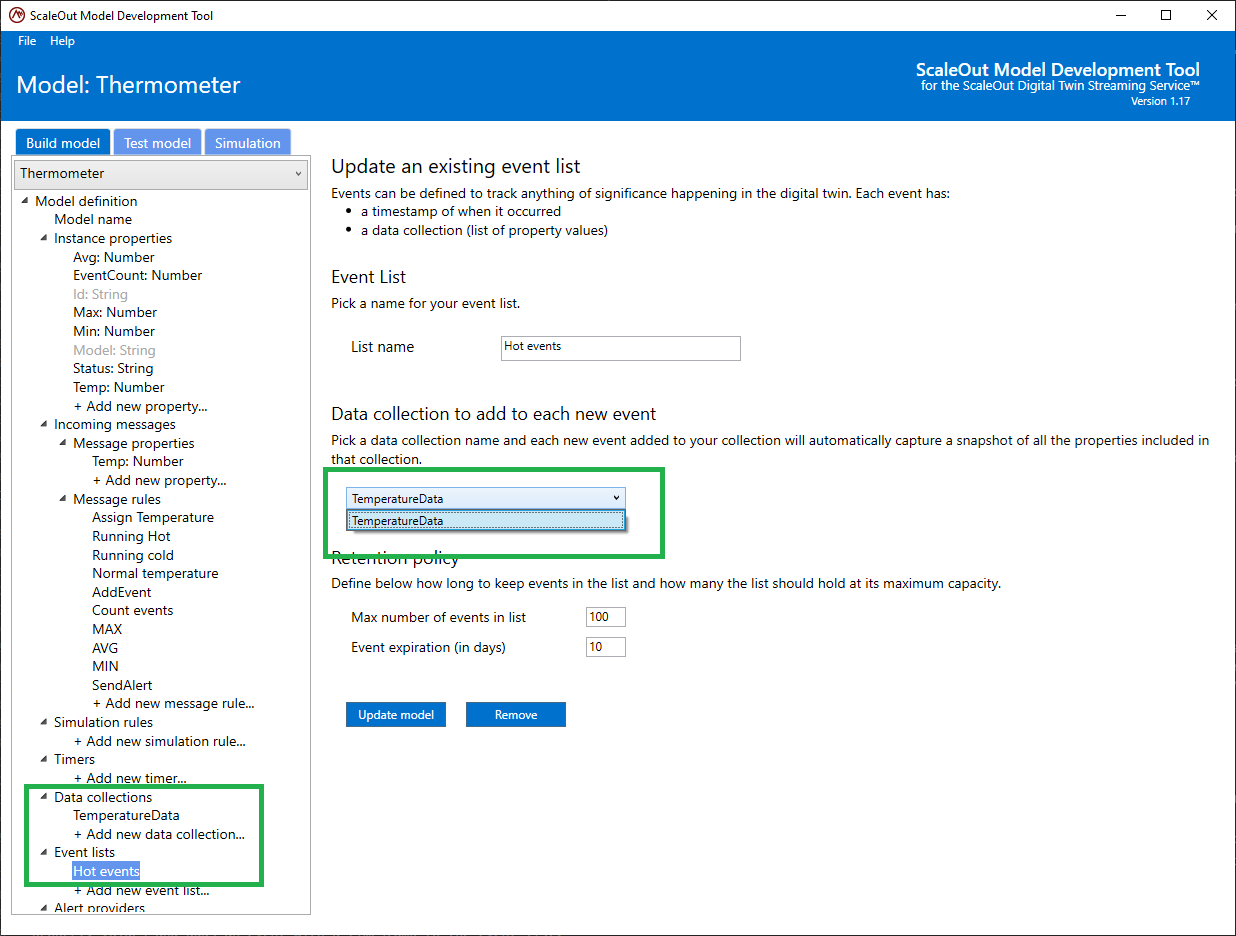
To define an event list, click on Add new event list under Event Lists in the tree at the left. You can then give the event list a unique name, set its retention policy, and select the data collection used to specify the properties stored in events.
To control memory usage, event lists have an event retention policy. You can specify the maximum number of events you want to store at any given time and the maximum number of days to hold onto stored events. When new events arrive and the list has reached its capacity, the oldest events will be removed to make room for new ones.
The last step is to select a data collection that specifies the property values recorded in events stored in the event list. When a new event is created, the system automatically takes a snapshot of these property values and adds an event with a timestamp to the event list.
Events can be added to an event list either automatically by an ML algorithm or explicitly using the ADD_EVENT function in a rule. You can use an aggregator function (described below) to analyze the events stored in an event list. For example, you can compute average or max/min values or count how many times a certain type of event occurred over a certain period of time. The results of this analysis can be used to log messages and/or trigger alerts. For example, a real-time digital twin tracking a thermometer could log a message if it observes more than 10 extreme temperature events in the last hour.
Here is an example of a rule that uses the LAST_COUNT_EVENTS aggregator function on an event list named TempEvents:
IF LAST_COUNT_EVENTS("TempEvents", GET_DURATION_FROM_HR(1)) > 10 THEN LOG_MESSAGE(2, "We had more than 10 events in the last hour")
Another rule could trigger an alert if the average temperature recorded in the event list exceeds a threshold value:
IF LAST_AVERAGE("TempEvents", GET_DURATION_FROM_HR(12)) > 100 THEN SEND_ALERT("HotAlert", "CRITICAL", "Temperature too high", "The average temperature over the last 12 hours is higher than 100F")
The helper function GET_DURATION_FROM_HR is used in the above examples to provide a duration specified in hours to the aggregation functions.
Aggregators
Events stored within event lists can be analyzed using four different aggregation functions, called aggregators, each with 2 versions:
LAST_COUNT_EVENTS / RANGE_COUNT_EVENTS : counts events within a given time window
LAST_AVERAGE / RANGE_AVERAGE : creates an average of a given property within a given time window
LAST_MAX / RANGE_MAX: computes the maximum value of a given property within a given time window
LAST_MIN / RANGE_MIN: computes the minimum value of a given property within a given time window
For each aggregator, we offer 2 ways to define the time window:
LAST_xxx: aggregates events that were triggered within the last xxx minutes/seconds
RANGE_xxx: aggregates events that were triggered within a time window defined by a start and end date/time
Time Windows
Each aggregator needs either a duration or a start and end date/time to define the time window of interest for the aggregation. If you use a start or end date/time, enter the date/time using the ISO 8601 standard <date>T<time> for date and time, for example, “2014-11-15T18:32:17”. Durations are also specified using the ISO 8601 format, and you can use helper functions to generate the proper format. The ISO 8601 format for durations has the form PnYnMnDTnHnMnS, where nY is the number of years, nM the number of months (if in the date or minutes if in the time), nD is the number of days, nH is the number of hours, and nS is the number of seconds. Here are some examples:
P3D: represents 3 days
P4M: represents 4 months (if M is before T, it represents months)
PT3M: represents 3 minutes (if M is after T, it represents minutes)
P3M2DT3M: represents 3 months, 2 days, and 3 minutes
PT0.5S: represents 500 milliseconds (milliseconds are expressed as a decimal number of seconds)
Here are the helper functions you can call to easily express a duration and convert it to the ISO 8601 format:
GET_DURATION_FROM_MILLISEC: converts milliseconds to ISO 8601 format
GET_DURATION_FROM_SEC: converts seconds to ISO 8601 format
GET_DURATION_FROM_MIN: converts minutes to ISO 8601 format
GET_DURATION_FROM_HR: converts hours to ISO 8601 format
Alert Providers
Alert monitoring services, such as Splunk On-Call and PagerDuty, enable companies to monitor their systems and deliver alerts when unusual conditions require the attention of personnel. The ScaleOut Digital Twins service integrates with these services and with Slack for this purpose. You can configure these services for use with real-time digital twins so that they can send alert notifications when conditions warrant. You do so using the ScaleOut Digital Twins Management UI, and associate an alert provider with a digital twin model at the time of deployment.
Please refer to the topic Alert Providers for details on configuring supported alert providers.
For rules-based models, alerts are either configured to be sent automatically on spike or anomaly detection, or manually by using functions in rules: using the functions SEND_ALERT or SEND_ALERT_WITH_DATA.
Timers
As described in the overview section, timers in rules engine models are blocks of rules to be executed either once or at regular time intervals. When defining a new timer, define a set of rules to execute when the timer expires, as well as how long the timer interval is and whether it should be run more than once. There are two types of timers:
A recurring timer will execute the block of rules every time the set interval in seconds expires.
A one-time timer will only execute once, when the set interval expires for the first time after the timer is started.
To create a new timer, select Add new timer… in the tree. Provide a name, the type of timer (one-time or recurring) and the interval in seconds.
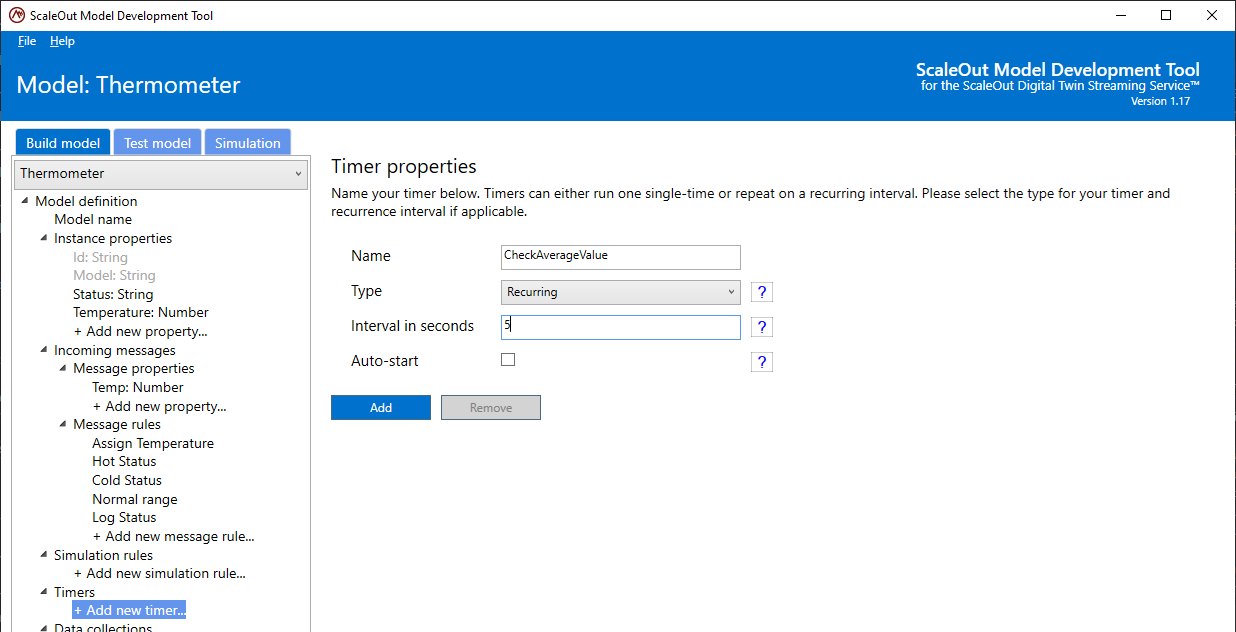
See below how to add rules to your new timer.
Starting and stopping timers
Once a recurring timer is started, it will run the set of rules you defined at the chosen time interval until the digital twin instance is stopped or until the timer is explicitly stopped.
To control when a timer starts or stops, use the START_TIMER and STOP_TIMER functions.
For instance, you could decide to create a message rule to only start a timer after the first message is received.
IF (ReceivedMessageCount > 1) THEN START_TIMER("myTimer")
When defining a timer in the tool, you can select the option to auto-start. This means as soon as the digital twin instance is created, the timer will start.

Timer rules
Once you have created your timer (picked the name, recurrence model and time interval), you need to define what will happen every time the timer is invoked. Add rules to your newly created timer by selecting it in the tree and Add new timer rule…. In your rule definition, you can refer to any instance properties and use the same language syntax as for incoming message rules.
Say you have a model that receives messages with a temperature, and the model keeps track of a ComputedAverage value. You could define a timer that checks every 5 seconds that the average does not drop below a certain threshold.
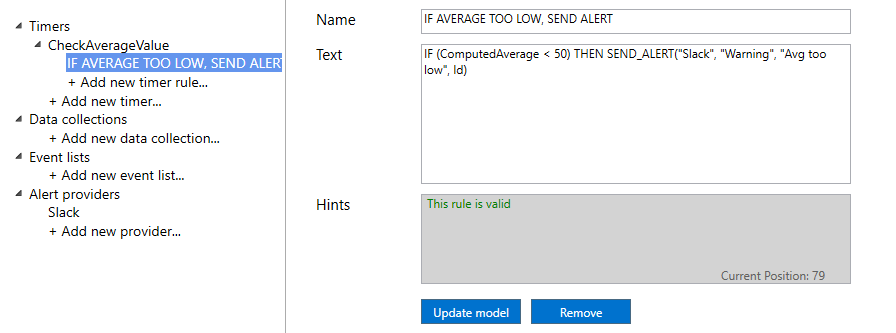
You can add as many rules as you need in each of your timers. As for message rules, the timer rules get executed in the order they are defined. Move rules up or down to control the sequence of rules.
Note
Rules for timers follow the same syntax as message rules and have access to the same library of built-in functions. The only difference with message rules is that they are not run when a new message is received. As a result, they cannot refer to message properties as they are not related to any incoming messages.
Testing timers
You can test the rules execution for each timer you defined in your model by using the Test tab. The test mode does not trigger the timer on a time interval because of the asynchronous nature of the testing environment (you can debug your rules by pausing their execution), but you will be able to manually trigger any given timer to monitor that its rules function as expected.
Refer to Testing a model for more details on testing timers in rules-based models.
Machine Learning Models
Using the ScaleOut Model Development Tool, you can create real-time digital twin models that run machine learning (ML) algorithms to detect spikes or unexpected trends in property values. You can also use ML to detect anomalies in the values of a group of properties by configuring an ML algorithm for a data collection. This requires training an ML algorithm with historical data to recognize specific combinations of properties that are considered anomalous. Using ML allows you to monitor changes in property values without the need to create rules or write code.
Note
The machine learning techniques employed by real-time digital twins are described in the Machine Learning topic.
After configuration, the ML algorithm runs in each real-time digital twin instance when a message is received from the corresponding data source. This allows the configured properties and data collections to be analyzed for unexpected changes. If an unexpected change is detected, the real-time digital twin can take the following actions:
add an event to an event list for further processing and/or
send an alert to a configured alert provider.
Spike and Trend Change Detection
You can configure spike and trend change detection for individual properties. Spike detection uses an ML algorithm, and trend detection uses statistical analysis. Spike and trend change detection can optionally be configured when creating or updating a property.
Spike Detection
To configure spike and trend change detection, create a new property or select the property in the tree list at the left. This displays the following pane:
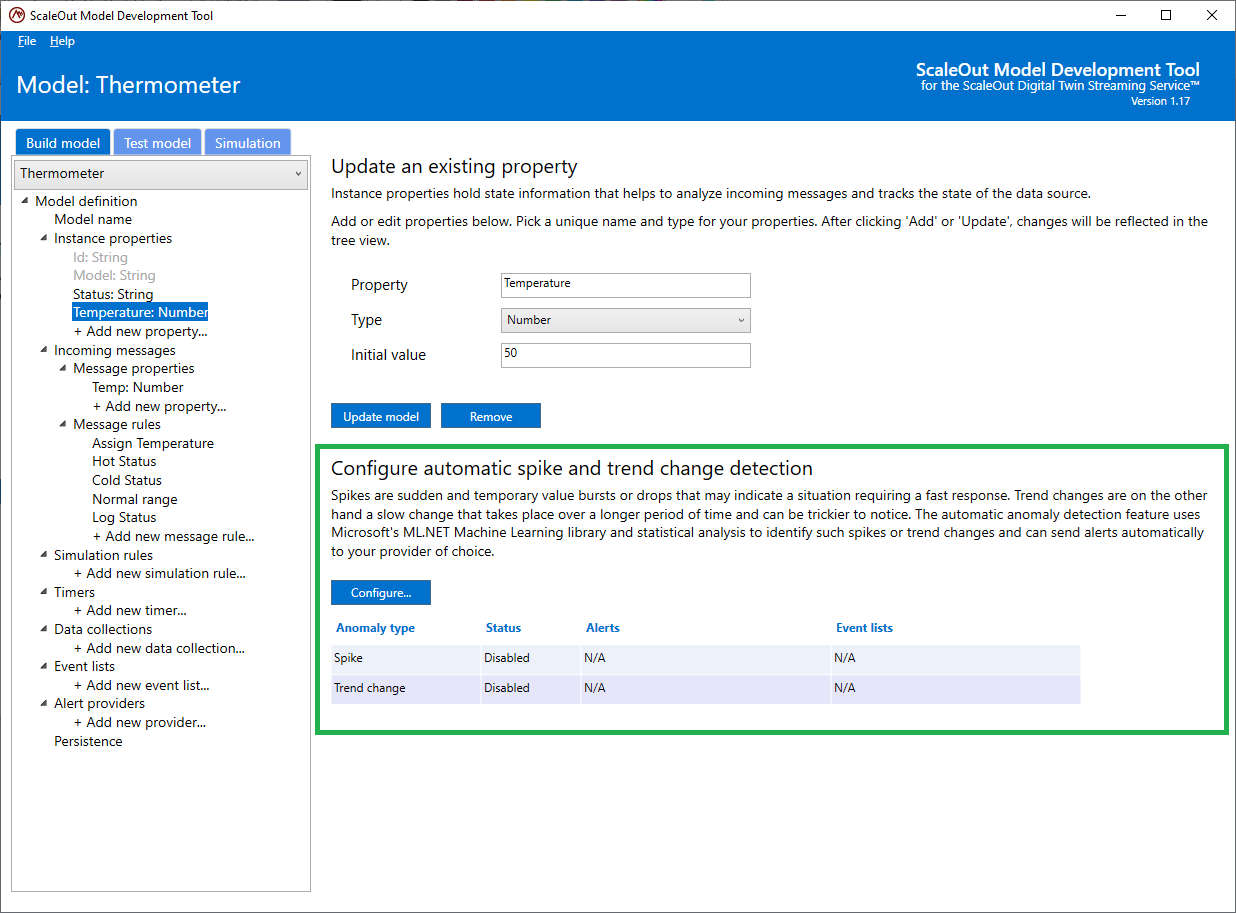
In the section Configure automatic spike and trend change detection, you can see a summary table that indicates the current configuration as well as a button to edit the configuration. Click the Configure button to open the configuration dialog:
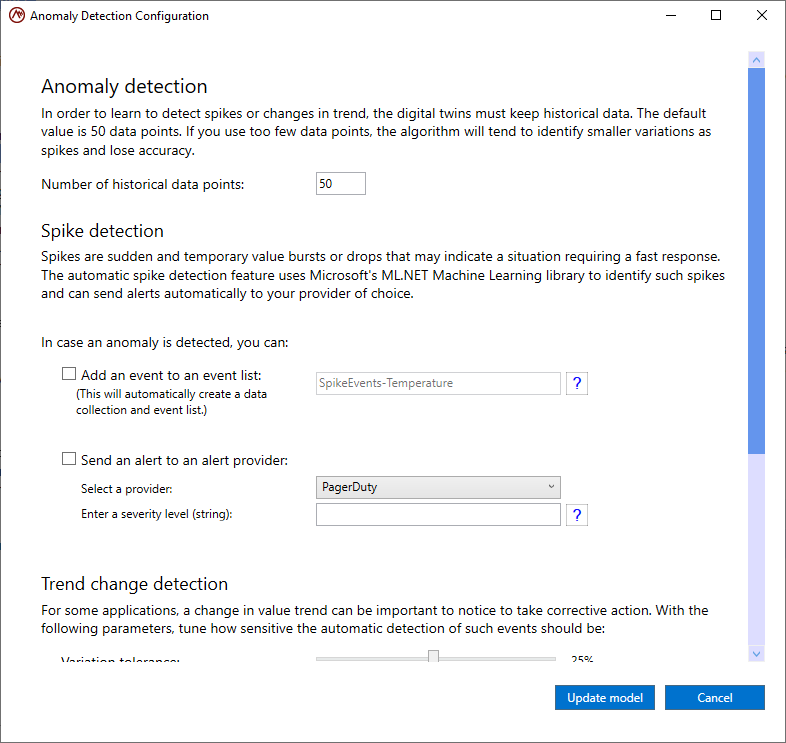
In this dialog, you can first set the number of historical data points to use for spike and trend detection. The default value is 50 data points. Multiple data points are needed to calibrate the detection algorithms. Using too few data points decreases the accuracy of the algorithms, while using too many requires excess memory and may also affect the sensitivity of the algorithms.
Next, you can configure the actions to take when a spike is detected. There are two configuration options:
Add an event to an event list: This option will automatically create the event list if it doesn’t exist. You also can create rules that aggregate event data in the event list for analysis and possible alerting.
Send an alert to an alert provider: This option will automatically send an alert to a configured alert provider when a spike or trend change is detected.
If both options are unchecked, spike detection is disabled.
Once you have completed configuring spike detection, click on the Update model button to save the configuration or click on Cancel to cancel the changes.
Note
Details on configuring alert providers can be found in the topic Alert Providers.
Trend Change Detection
Using the same configuration dialog, scroll down to configure a property for detecting trend changes:

The actions to take are the same as those for spike detection and can be set independently for spike and trend change detection. In addition to specifying these actions, you can configure two additional settings:
Variation tolerance: controls the sensitivity of the trend change detection algorithm
Frequency: controls how often real-time digital twin instances can report trend changes
Anomaly Detection for Data Collections
Anomaly detection in machine learning is a process that identifies outliers for a set of values, such as a combination of engine parameters (e.g, oil temperature, RPM, and exhaust gas temperature). It employs supervised machine learning, which requires training with a dataset that labels normal and abnormal value combinations. The trained algorithm can then be used to predict anomalies when each real-time digital twin receives messages from its data source. While spike and trend change detection can be configured for a single numerical property, anomaly detection is configured for a data collection so that multiple property values can be examined as a group.
It uses an ML algorithm called a binary classification algorithm, which is trained using historical values for the data collection.
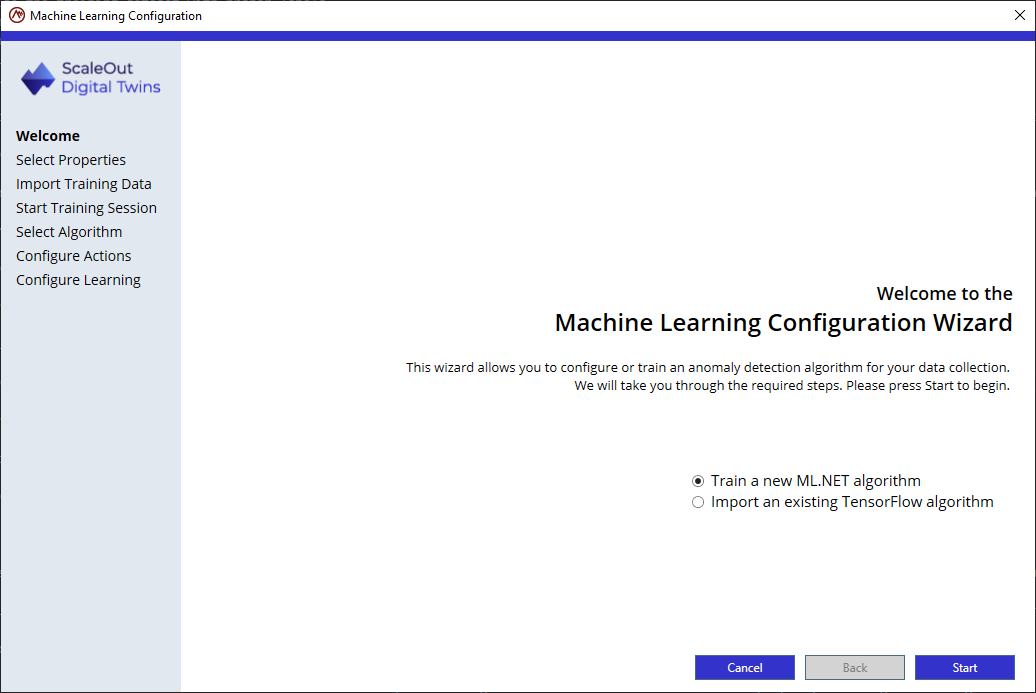
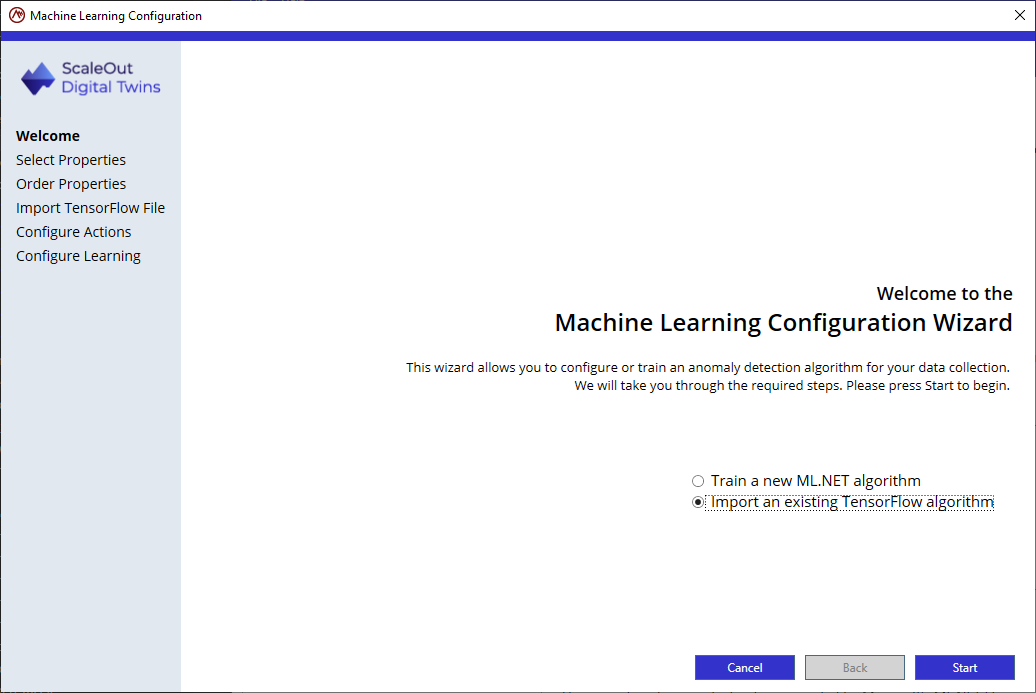
You will have two options for your model:
Create and train an ML.NET machine learning algorithm
Import an existing TensorFlow machine learning algorithm
In both cases, you will have options for actions to take when an anomaly is detected: sending an alert to a monitoring service, or keeping track of it in an event list.
Create and Train an ML.NET Machine Learning Algorithm
The anomaly detection algorithms available for Digital Twins are binary classification algorithms trained with labeled data indicating whether the data constitutes an anomaly. These algorithms are provided by the Microsoft’s ML.NET library.
The algorithms used for anomaly detection are called binary classification algorithms because they classify the elements of a set into two groups (normal or abnormal in this case). ML.NET offers many binary classification algorithms, and each algorithm has characteristics that make it better suited for specific applications. You can select one or more algorithms for training and evaluation to find the best fit for your application.
Here is the list of the ML.NET binary classification algorithms that can be used in the ScaleOut Digital Twins (Source: ML.NET documentation)
AveragedPerceptron : linear binary classification model trained with the averaged perceptron
FastForest : decision tree binary classification model using Fast Forest
FastTree : decision tree binary classification model using FastTree
LbfgsLogisticRegression : linear logistic regression model trained with L-BFGS method
LightGbm : boosted decision tree binary classification model using LightGBM
LinearSvm : linear binary classification model trained with Linear SVM
SdcaLogisticRegression : binary logistic regression classification model using the stochastic dual coordinate ascent method
SgdCalibrated : logistic regression using a parallel stochastic gradient method
SymbolicSgdLogisticRegression : linear binary classification model trained with the symbolic stochastic gradient descent
FieldAwareFactorizationMachine : field-aware factorization machine model trained using a stochastic gradient method
As part of the configuration process, you will train several candidate ML algorithms using a technique called supervised machine learning. Machine learning algorithms can be trained with two approaches: supervised or unsupervised. Supervised learning means that the algorithm is trained with labeled data. In the case of anomaly detection, this means each line of the training data set includes a label indicating whether or not an input is an anomaly. The algorithm learns the relationship between inputs and outputs based on the label for each line of the training data set. Unsupervised learning algorithms are trained without labels to make sense of unorganized data. Once trained, the algorithm can be used to make a prediction on new unlabeled data.
This is accomplished by providing a file with a dataset of historical values for all properties in the data collection along with a true/false label for each set of values; “true” indicates that the values have anomalies, and “false” indicates that they are normal. These historical values train the algorithms to classify future value combinations as either anomalous or normal. Once you have trained several algorithms, you will select the algorithm with the best combination of metrics for deployment in the real-time digital twin model. This algorithm will run independently in each instance of the real-time digital twin.
Configuring a data collection for anomaly detection requires the following steps:
Select the properties to train the model with.
Provide the training dataset with proper labels.
Train multiple ML algorithms using the provided dataset.
Evaluate algorithms using metrics from training and select the best fit for the application.
Configure the actions to take when anomalies are detected.
Configure continuous learning options.
To start configuring anomaly detection for a data collection, create a new data collection or select an existing data collection in the tree list to display the current ML configuration status and start the configuration process:
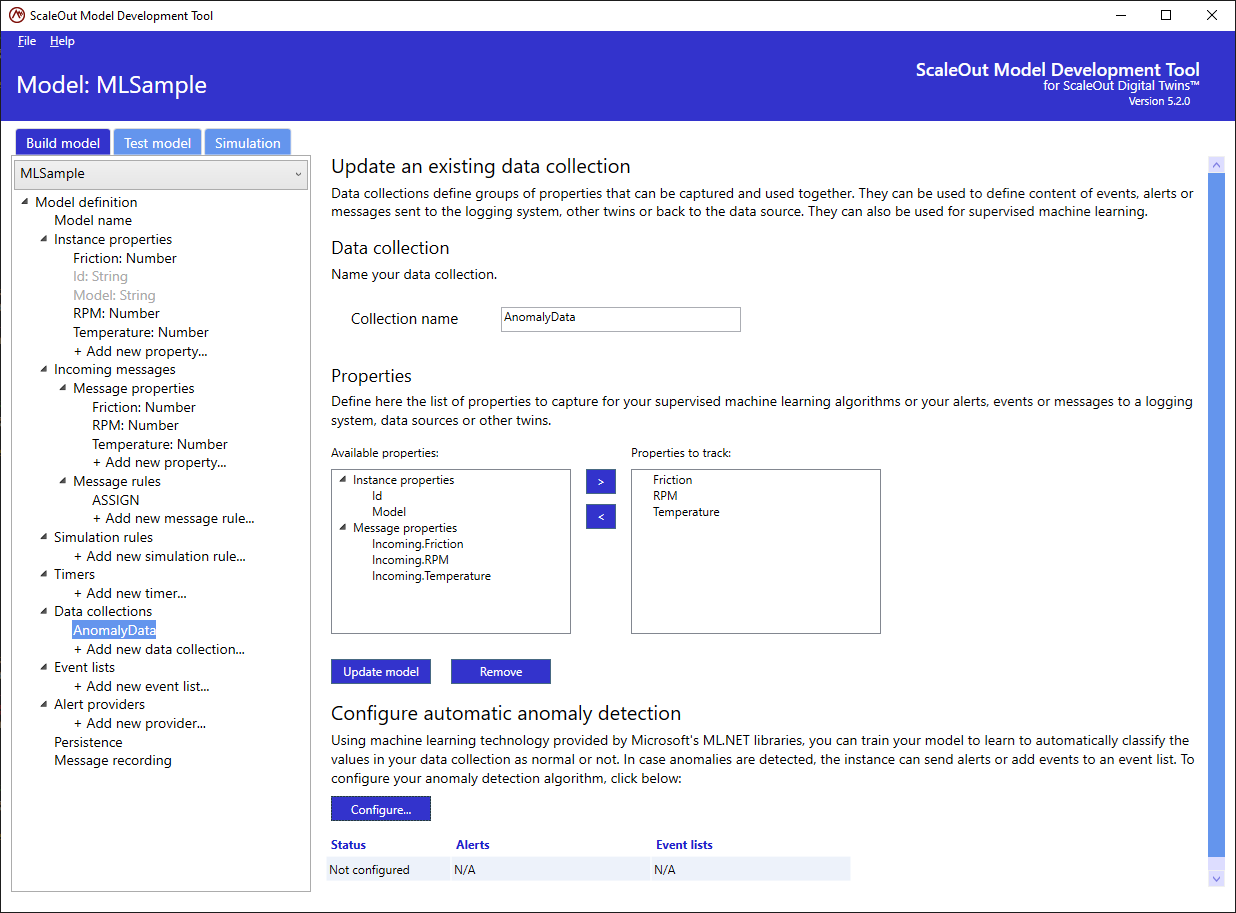
Click on the Configure button to start the configuration wizard. You can also click on the Remove button to remove a previous configuration.
In order to create and train a new ML.NET algorithm, select Train a new ML.NET algorithm and click Start.
Step 1: Select the properties
The tool suggests the numerical properties included in the data collection. Select the properties that correspond to your training data.

Step 2: Upload training data
The next step in the configuration wizard allows you to upload training data:
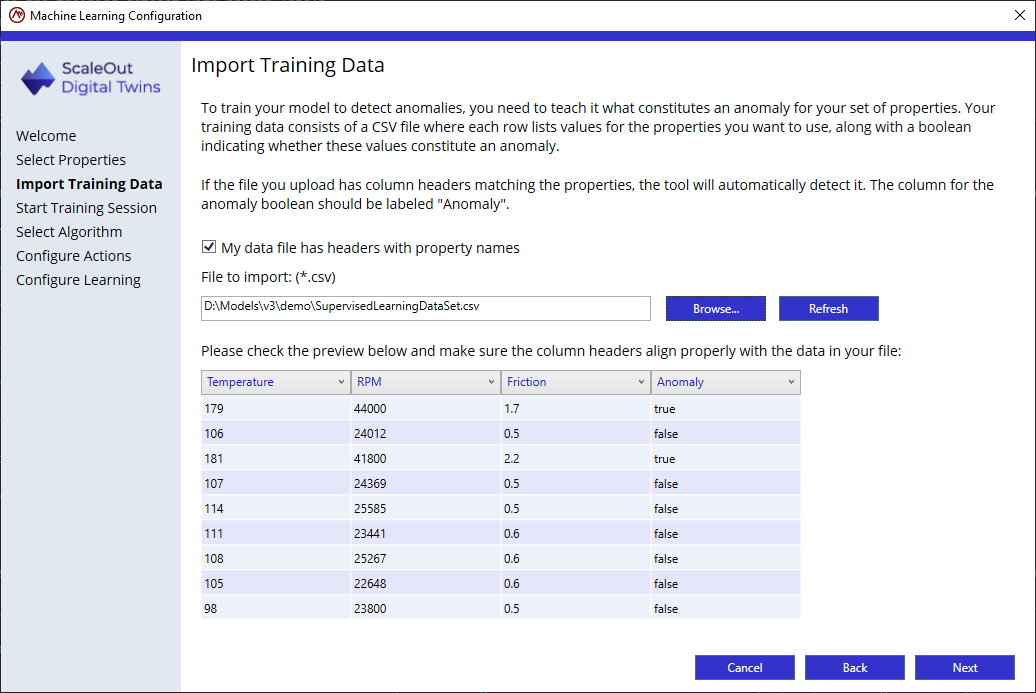
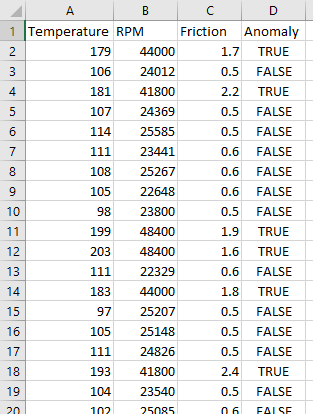
In this step, you provide a CSV file (comma-separated values) with training data for the ML algorithms. Every row in the file should contain a value for each property in the data collection and a value with “true” or “false” where “true” indicates that the group of values represents an anomaly, and “false” indicates that the values are normal.
The file’s first row should contain the names of the properties and the label “Anomaly” for the true/false value; this is called a header row. If the file contains a header row, check the My data file has headers with property names check box so that the wizard can automatically associate the data with the appropriate properties.
The tool will attempt to match the columns to the properties of the model selected in the previous page and will display a preview of the first 10 rows of the training file to visually validate that the columns are matched to the appropriate properties.
If you omit the header row, you can manually select property names for each value in the preview.
Note
Be sure to confirm that the columns shown in the preview align with the correct data to avoid improperly training the ML algorithms. If necessary, reassign the columns to the appropriate properties.
Here is an example of a training file:
Once all column assignments have been verified, click the Next button to go to the next step in the wizard.
Step 3: Start training session
The next step is to train and evaluate one or more binary classification algorithms. The ScaleOut Model Development Tool includes ten algorithms from Microsoft’s ML.NET machine learning library. Select the algorithms you want to train and then click on the Next button to start training:
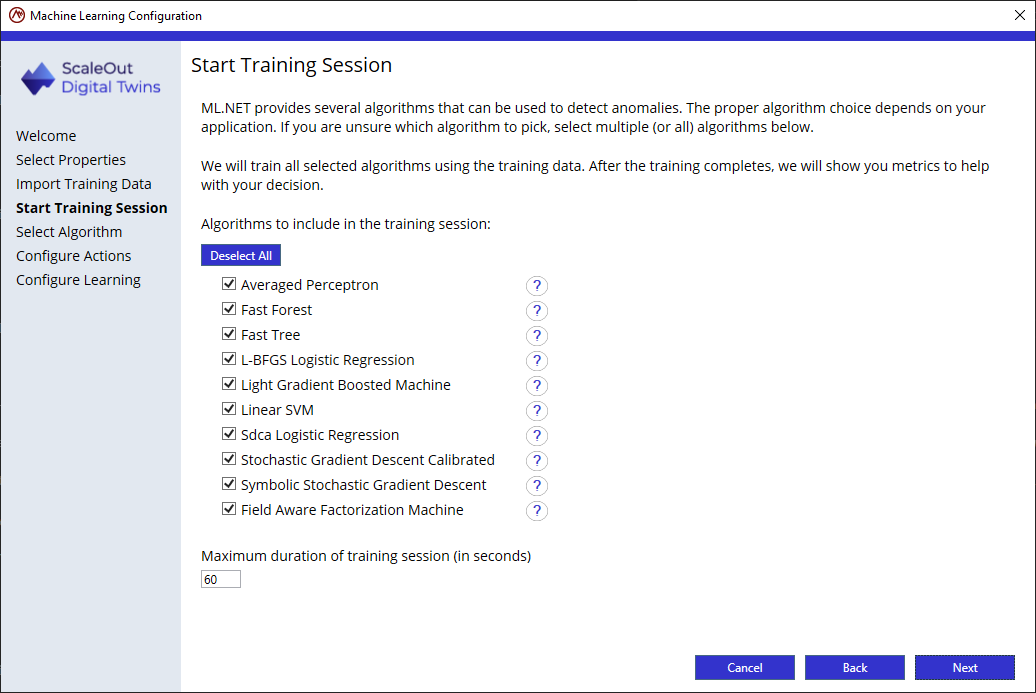
A portion of the data set (80%) is used for training while the remaining 20% is used for evaluating the trained algorithms. After training each algorithm, the wizard will display a table with metrics for each algorithm.
You can limit the time that the system trains each algorithm using the box at the bottom of the pane. Training is usually relatively fast, but it may be useful to set a maximum training duration. If some algorithms don’t complete training in the time you allow, you can go back and update the value or use an algorithm that did complete training.
Step 4: Analyze results and select algorithm
After training completes, the algorithms are shown in a table summarizing their evaluated metrics. In this step you can review the metrics and select the algorithm that best fits your needs. Then click on the Next button to proceed to the next step:
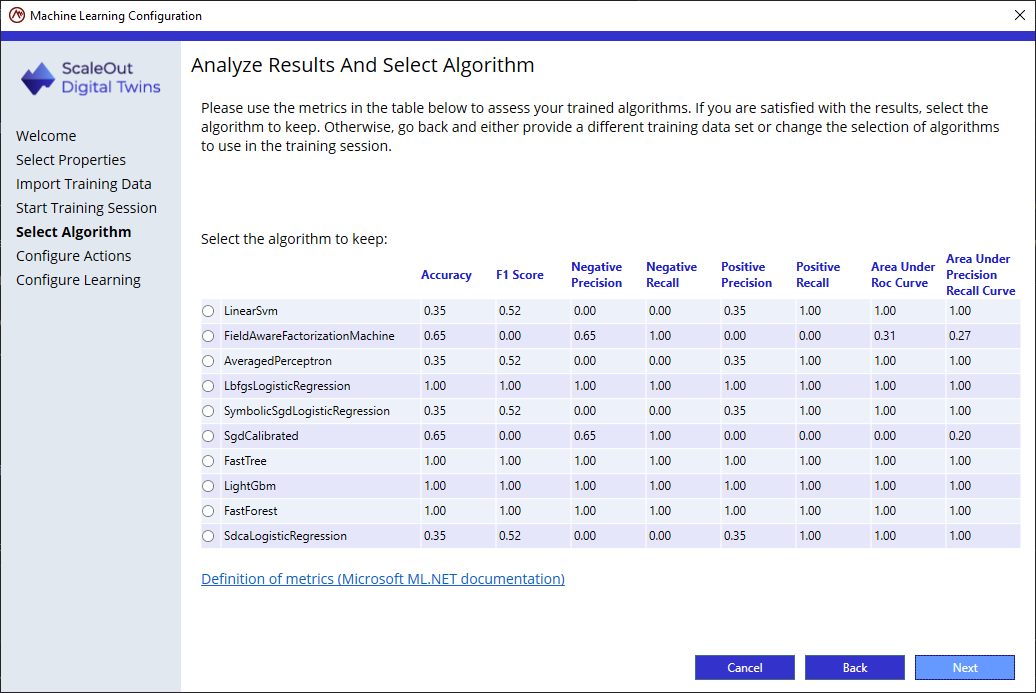
While accuracy is essential, it is not the only consideration. Refer to the topic Machine Learning Metrics for more information on what the metrics mean.
Step 5: Configure actions
In this step, you will decide 2 important aspects:
whether the anomaly detection is automatically evaluated for each new message automatically or manually
if you opt for automatic detection, what actions to take if an anomaly is detected.
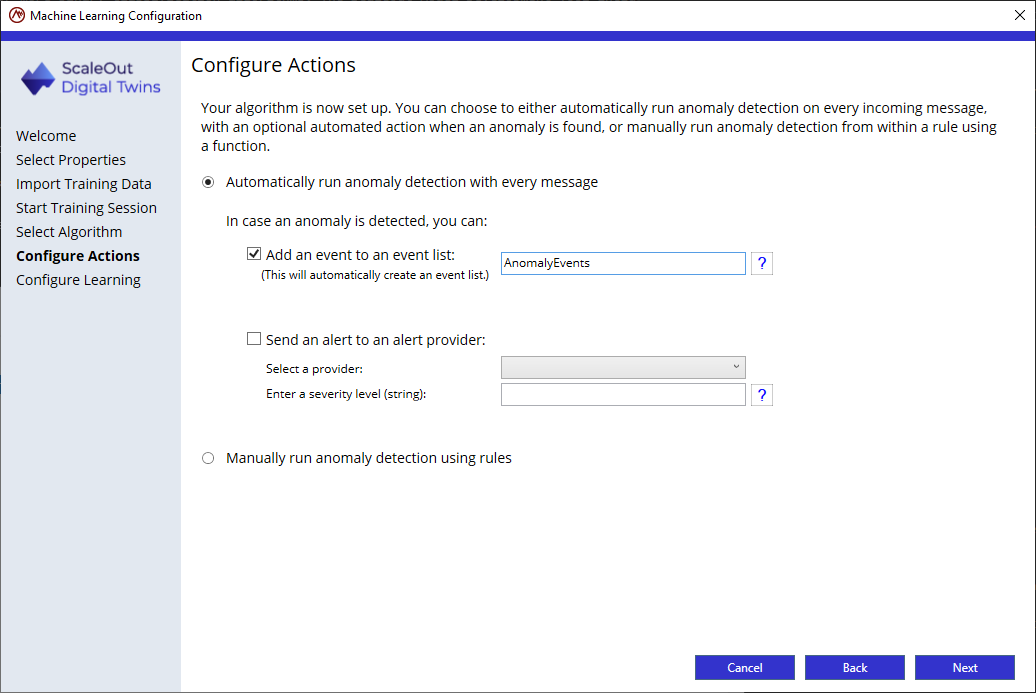
By default, anomaly detection will be run automatically after each new message has been received. The second option is to manually obtain a prediction using the function GET_ANOMALY_PREDICTION inside a rule. From within that same rule, you can define what action to take if an anomaly is predicted.
If you select to automatically run anomaly detection with every new message, the following actions are available when the ML algorithm detects an anomaly for the data collection:
Add an event to an event list: This option will automatically create the event list if it doesn’t exist. You also can create rules that aggregate event data in the event list for analysis and possible alerting.
Send an alert to an alert provider: This option will automatically send an alert to a configured alert provider when an anomaly is detected.
Step 6: Continuous learning
Machine learning uses algorithms and training data to find patterns and make predictions. This can be valuable in situations where data can evolve rapidly and your machine learning algorithms need to be updated frequently.
Depending on your algorithm type or work flow, you have several options to update your machine learning algorithms using ScaleOut Digital Twins. Retraining an algorithm requires new training data. The digital twins can use an API to report anomalies in case of identifiable issues. These new data points are stored and available for download. This new data can be added to the original dataset to train the algorithm from scratch using an extended dataset, or if the algorithm supports incremental retraining, the new dataset can be fed to the original trained algorithm for refining.
In rule-based models, you can improve prediction accuracy over time by collecting more data by using the function REPORT_ANOMALY_DATA.
TensorFlow algorithms are not currently supported for automated retraining.
ML.NET libraries allow incremental retraining of some binary classification algorithms:
AveragedPerceptron : linear binary classification model trained with the averaged perceptron
LbfgsLogisticRegression : linear logistic regression model trained with L-BFGS method
LinearSvm : linear binary classification model trained with Linear SVM
SgdCalibrated : logistic regression using a parallel stochastic gradient method
SymbolicSgdLogisticRegression : linear binary classification model trained with the symbolic stochastic gradient descent
FieldAwareFactorizationMachine : field-aware factorization machine model trained using a stochastic gradient method
If your digital twin model uses any of these algorithms, you will be able to automatically retrain the algorithm with new data.
In the last page of the configuration wizard, you will select one of the following 3 options:
No retraining: if you don’t intend to collect new training data or retrain your algorithm once deployed.
Gather data only: if you plan to collect new training data but will retrain your algorithm manually.
Automatic retraining: if you plan to collect new training data and let the digital twin model automatically retrain the algorithm once enough new data has been collected.
To collect new data, you will use the function REPORT_ANOMALY_DATA from within a rule. For instance a rule could check for an actual failure and create new training data if the prediction was incorrect:
IF (Status = "Failure" AND GET_ANOMALY_PREDICTION("MyData") = FALSE)
THEN REPORT_ANOMALY_DATA("MyData", TRUE)
In this case, we can assume that a Status property tracks whether the component is in failure mode, and compares that with the result of the algorithm’s prediction for the current values in the data collection. If these don’t match, then we can use this data as new training data to refine the accuracy of the algorithm.
Click Close to complete the wizard.
Then click on Update model to finalize the ML configuration:
Import an Existing Trained TensorFlow Algorithm
Digital twins can use pre-trained TensorFlow algorithms instead of ML.NET algorithms. Configuring the model to import a TensorFlow algorithm is described in this section.
Prerequisites for TensorFlow algorithms
In order for the digital twins to use a TensorFlow algorithm, the algorithm must meet the following requirements:
- The input should be a vector of float named input_vector.
The size of the input vector is limited to 10 float values.
- The output is named output_0.
It is a float vector of size 1, whose value represents whether the prediction is an anomaly or not.
If the output value is lower than 0.5, it is considered not an anomaly. If it is greater or equal to 0.5, it is considered an anomaly.
The TensorFlow model has been converted to an ONNX file.
See Converting a TensorFlow model to an ONNX file for details on how to convert your TensorFlow model to ONNX.
Configuring a data collection for anomaly detection requires the following steps:
Select the properties that are used by the TensorFlow algorithm.
Order the properties to match the training set.
Import the existing algorithm.
Configure the actions to take when anomalies are detected.
Configure continuous learning options.
To start configuring anomaly detection for a data collection, create a new data collection or select an existing data collection in the tree list to display the current ML configuration status and start the configuration process:
Click on the Configure button to start the configuration wizard. You can also click on the Remove button to remove a previous configuration.
In order to import an existing TensorFlow algorithm, select Import an existing algorithm and click Start.
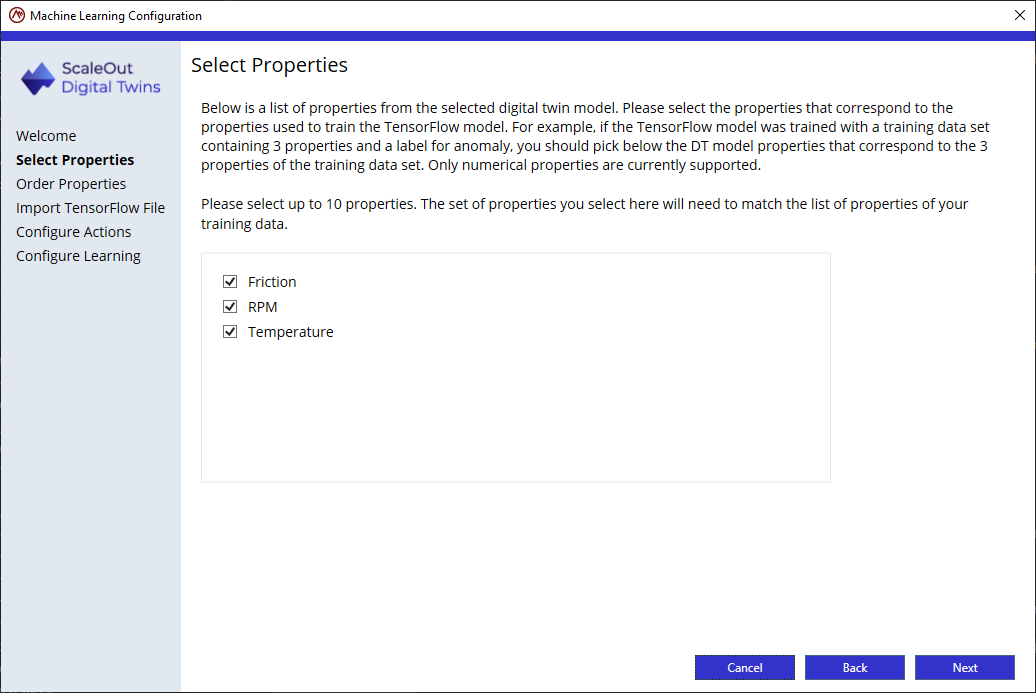
Step 1: Select the properties
The tool suggests the numerical properties included in the data collection. Select the properties that correspond to your training data.
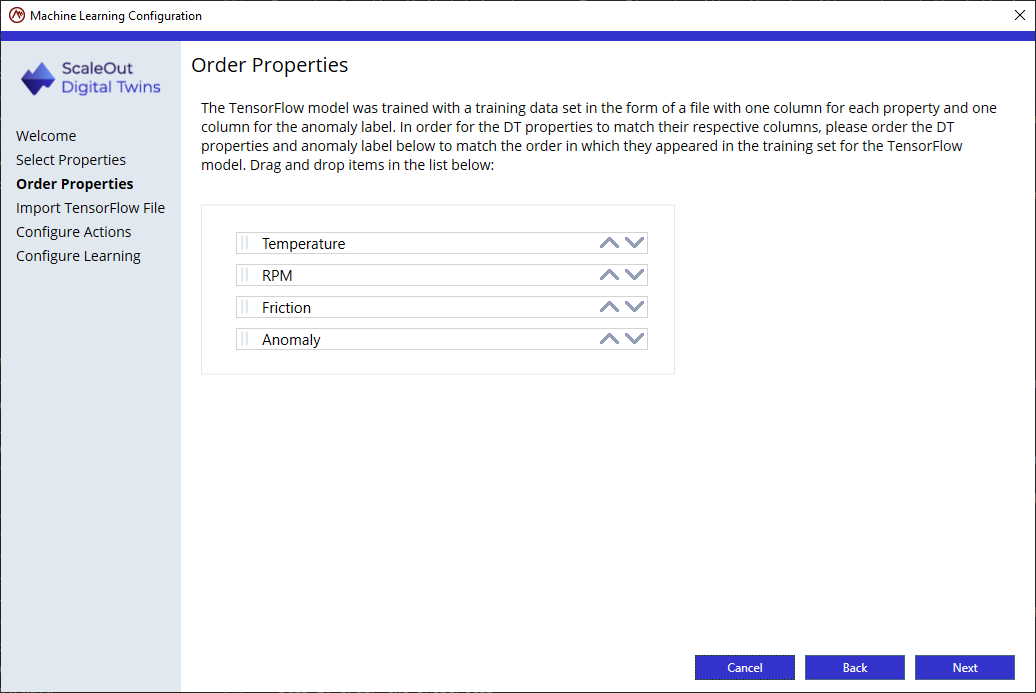
Step 2: Order the properties
At the time of training, the TensorFlow input variable were provided in a specific order. Order the selected properties to match that order.
In this example, the Temperature was the first column, followed by RPM, Friction and finally Anomaly. Drag and Drop properties to match the proper order.
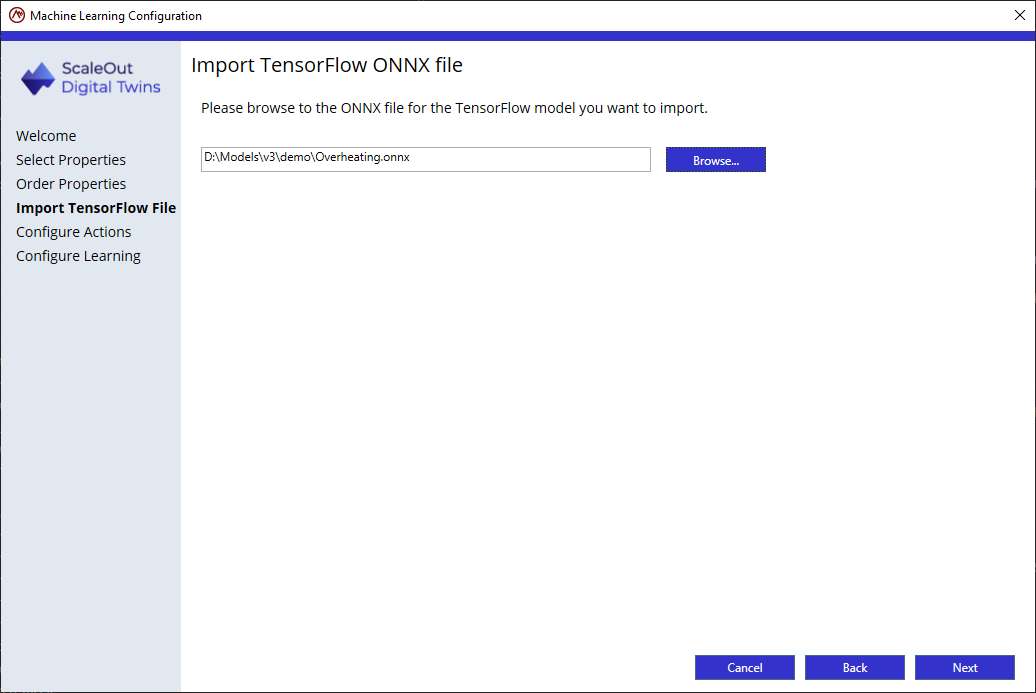
Step 3: Import the TensorFlow file
Browse to the location of the ONNX file for your algorithm.
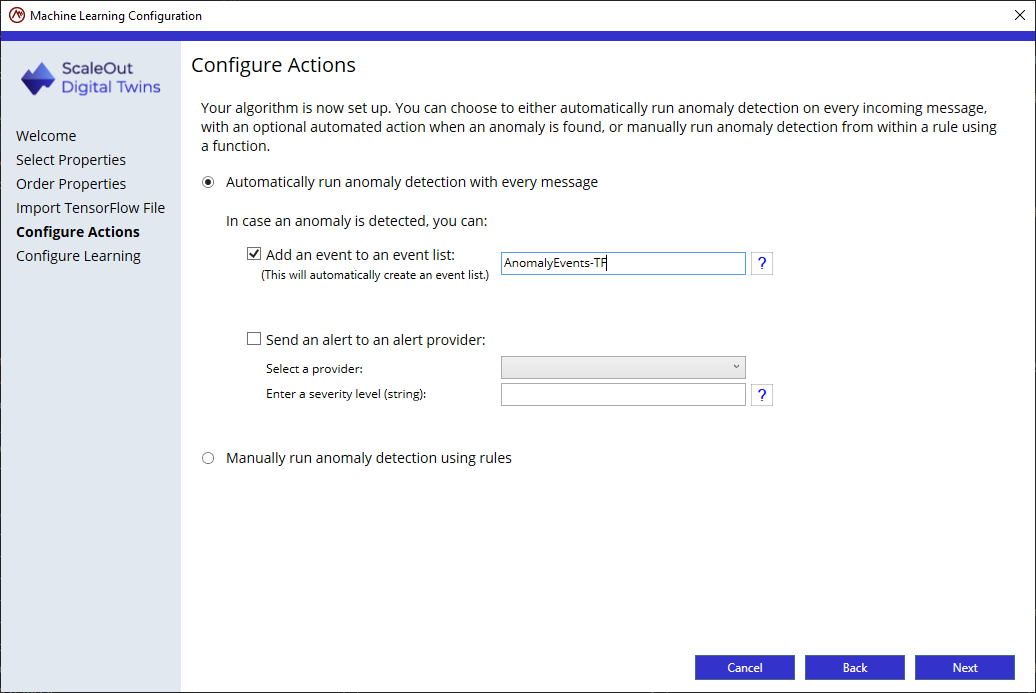
Step 4: Configure actions In this step, you will decide 2 important aspects:
whether the anomaly detection is automatically evaluated for each new message automatically or manually
if you opt for automatic detection, what actions to take if an anomaly is detected.
By default, anomaly detection will be run automatically after each new message has been received. The second option is to manually obtain a prediction using the function GET_ANOMALY_PREDICTION inside a rule. From within that same rule, you can define what action to take if an anomaly is predicted.
If you select to automatically run anomaly detection with every new message, the following actions are available when the ML algorithm detects an anomaly for the data collection:
Add an event to an event list: This option will automatically create the event list if it doesn’t exist. You also can create rules that aggregate event data in the event list for analysis and possible alerting.
Send an alert to an alert provider: This option will automatically send an alert to a configured alert provider when an anomaly is detected.
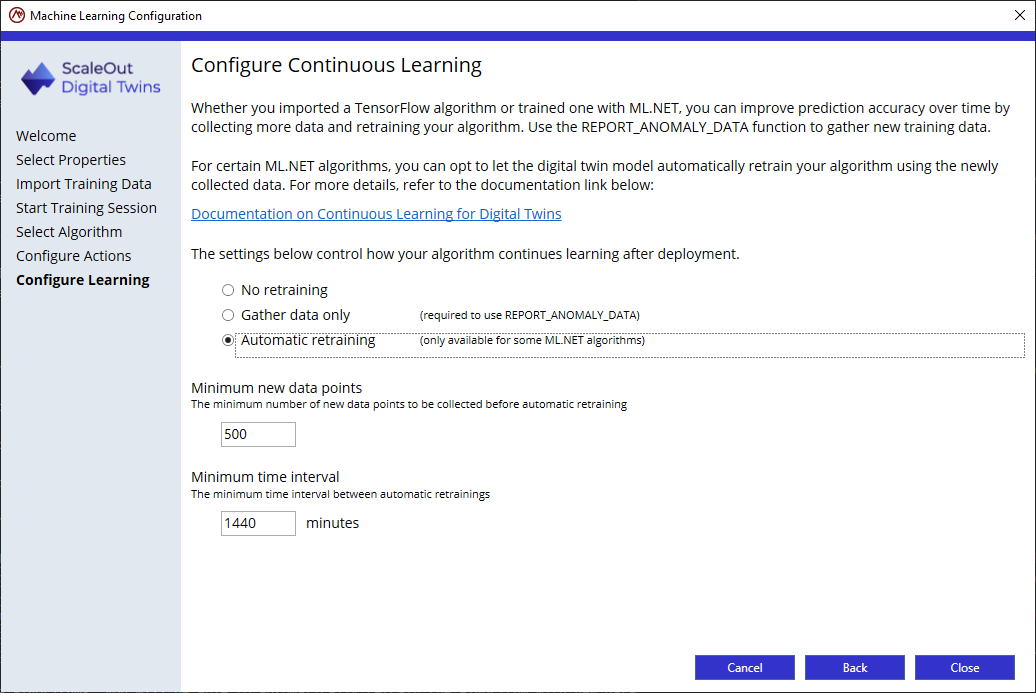
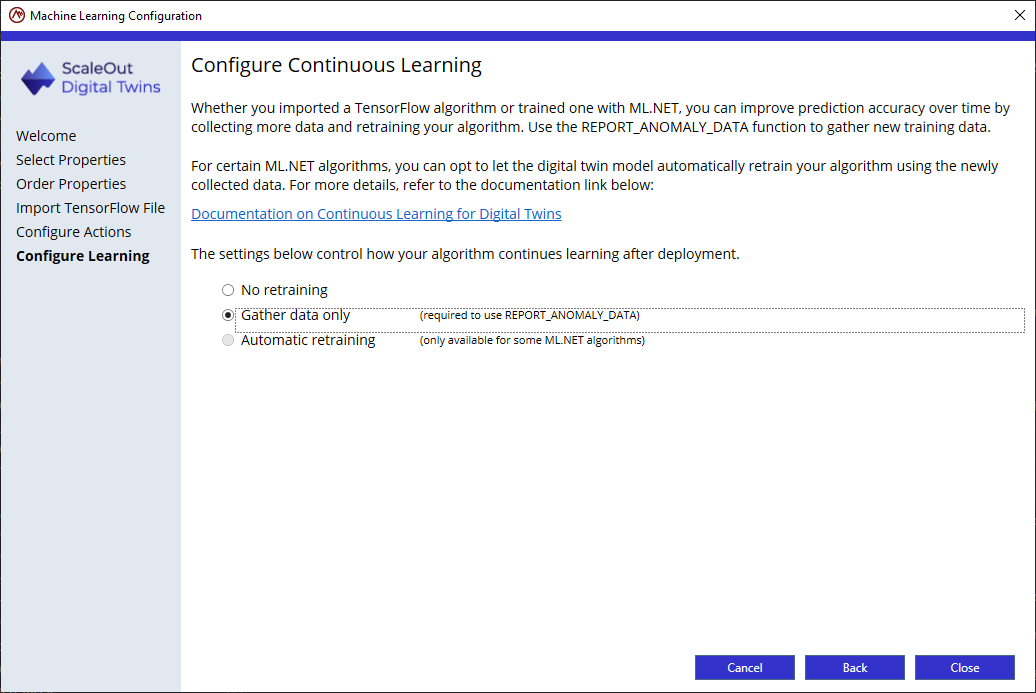
Step 5: Continuous learning
Machine learning uses algorithms and training data to find patterns and make predictions. In a world where data can evolve rapidly, updating your machine learning algorithms to account for new data can be highly valuable.
Depending on your algorithm type or work flow, you have several options to update your machine learning algorithms using ScaleOut Digital Twins. Retraining an algorithm requires new training data. The digital twins can use an API to report anomalies in case of identifiable issues. These new data points are stored and available for download. This new data can be added to the original dataset to train the algorithm from scratch using an extended dataset, or if the algorithm supports incremental retraining, the new dataset can be fed to the original trained algorithm for refining.
In rule-based models, you can improve prediction accuracy over time by collecting more data by using the function REPORT_ANOMALY_DATA.
TensorFlow algorithms are not currently supported for automated retraining, but digital twins can still facilitate the collection of new training data.
In the last page of the configuration wizard, you will select one of the following 3 options:
No retraining: if you don’t intend to collect new training data or retrain your algorithm once deployed.
Gather data only: if you plan to collect new training data but will retrain your algorithm manually.
Automatic retraining: Not available for TensorFlow algorithms.
To collect new data, you will use the function REPORT_ANOMALY_DATA from within a rule. For instance a rule could check for an actual failure and create new training data if the prediction was incorrect:
IF (Status = "Failure" AND GET_ANOMALY_PREDICTION("MyData") = FALSE)
THEN REPORT_ANOMALY_DATA("MyData", TRUE)
In this case, we can assume that a Status property tracks whether the component is in failure mode, and compares that with the result of the algorithm’s prediction for the current values in the data collection. If these don’t match, then we can use this data as new training data to refine the accuracy of the algorithm.
Note
If you retrain your TensorFlow algorithm and want to update it for your digital twin model, see how to manually upload the new algorithm.
Click Close to complete the wizard.
Then click on Update model to finalize the ML configuration:
Rules-Based Models
You can create a real-time digital twin model using intuitive business rules designed for use by analysts and engineers, and they avoid the need to develop code. Rules define the logic used to process incoming messages received by real-time digital twin instances. (They effectively replace the MessageProcessor algorithm used in code-based models, as described in the topic Message Processor). Rules are evaluated every time a message is received, and they run independently in each real-time digital twin instance.
Rules take one of two forms. Some rules perform actions, such as performing mathematical operations and assigning values to instance properties; numerous built-in functions are provided to assist in performing actions. Other rules run conditionally when a specified condition is met. Rules can also be used to create new messages to be sent to other digital instances or back to the real-time digital twin’s data source. They also can be used to generate alerts and log messages.
Note
Rules run in the order defined in the rules engine model. To change the execution order, move rules up and down in the list of rules.
Rule Language Definition
A rule performs one or more actions linked together by the AND keyword. An action can be either an assignment operation or an action function (for example, to log a message). A rule optionally can begin with a condition which controls whether the actions should be performed. A condition takes the form of a logical expression (described below).
In the rule syntax, an unconditional rule starts with a DO keyword, and a conditional rule starts with the IF keyword followed by the THEN keyword after the condition. In their simplest forms, rules look like the following:
DO action [ AND action ]*
or
IF condition THEN action [ AND action ]*
Here are some simple examples:
DO Temperature = 100
IF Temperature > MaxTemperature THEN MaxTemperature = Temperature
Here is an example of an unconditional rule that performs multiple actions and set both the Temperature and LastUpdate properties:
DO Temperature = Incoming.NewTemperatureValue AND LastUpdate = Incoming.TimeOfUpdate
Here is an example of a conditional rule that performs multiple actions. In this rule, if the value of the NewTemperatureValue property is above 100, the rule sets the StatusMessage property and then calls the LOG_MESSAGE function to log the message with priority 2:
IF Incoming.NewTemperatureValue > 100 THEN StatusMessage = "It is getting hot" AND LOG_MESSAGE(2, StatusMessage)
Parentheses
Parentheses can be used to group logical or arithmetic expressions in actions or conditions. This helps disambiguate complex expressions, such as chained arithmetic operations. Parentheses can be nested.
Here are some examples of rules that use parentheses:
IF (condition1 OR condition2) THEN action
IF ((condition1 OR condition2) AND condition3) THEN action
IF ((condition1 AND condition2) OR condition3) THEN action
IF (property < value) THEN action
IF (property < (value * 10 / 100)) THEN action
IF property1 = (property2 + 10) THEN action
Properties, Constants, and Data Collections
Both properties and constants can be used in expressions. Instance properties are referred to by their property names, and incoming message properties are prefixed by Incoming., for example:
DO Temperature = Incoming.NewTemperatureValue
Constants are used to represent numbers, strings delimited by double quotes, or boolean values, for example:
75.2
"Status: alerted"
true
Note that numbers can be either integer or floating point; all numeric values are stored internally as double precision floating point numbers. Here are examples of constants used in rules:
IF (NumberProperty > 100) THEN ...
IF NumberValue <= 10.4 THEN ...
DO StringProperty = "Some text"
IF DateProperty > "2021-03-15" THEN ...
In some cases, data collections are referred to in functions. For example, the property values in the data collection TempData can be sent in a message:
IF (Incoming.Temperature > 100) THEN SEND_TO_DATASOURCE(TempData)
Arithmetic Expressions
Arithmetic expressions combine properties and Number literal values using arithmetic operators and math functions; they result in a Number value. The available arithmetic operators are:
‘+’: addition
‘-’: subtraction
‘*’: multiplication
‘/’: division
Here are some examples:
Temperature + 1.5
Incoming.RPM * 5
POWER(Incoming.Radius, 2) * 3.14157
Arithmetic operations can be chained together, and they can be grouped using parentheses to ensure proper associativity, for example:
IF (Property1 > ((MinValue * 20 / 100) + Property2)) THEN ...
When not overridden by parentheses, multiple arithmetic operations are evaluated from left to right. Multiplication and division take precedence over addition and subtraction.
Note
Arithmetic operators are only available for the Number data type except for addition, which is available for strings.
Logical Expressions
Logical expressions use comparison operators to combine properties, Number literal values, Boolean values and arithmetic expressions. They result in a Boolean value (that is, true or false) The available comparison operators are:
‘=’: equal to
‘<’: lower than
‘<=’: lower than or equal to
‘>’: greater than
‘>=’: greater than or equal to
‘!=’: not equal to
Here are some examples:
Incoming.Temperature < MaxTemperature
SQRT(CurrentRadius) >= 17.5
AlertStatus = "High alert"
Logical expressions can be used in IF rules as conditions. These conditions can be chained together using the logical operators AND and OR.
Use parentheses to avoid confusion when chaining multiple conditions, for example:
IF condition1 AND condition2 THEN action
IF condition1 OR condition2 THEN action
IF condition THEN action1 AND action2
IF (condition1 AND condition2) OR condition3 THEN action
IF ((condition1 OR condition2) AND condition3) THEN action
Conditions can be chained using any combination of AND and OR operators. Actions can only be chained with the AND operator.
If parentheses are omitted when AND and OR operators are chained together, AND takes precedence over OR. For example, the following expression:
IF condition1 OR condition2 AND condition3
would be equivalent to:
IF condition1 OR (condition2 AND condition3)
Arithmetic operators take precedence over logical operators. This allows arithmetic expressions to be used in logical expressions with predictable behavior. However, it’s always safer to use parentheses to avoid ambiguity.
Actions
A rule can implement two types of actions:
Property assignment: Assigns a value to an instance or message property.
Function call: Runs one of the built-in action functions.
A property assignment uses the following syntax:
property = value
Where value can be another property, a constant, or an arithmetic or logical expression. The property and the new value must be of compatible types, so, for example, a string cannot be assigned to a number property. Here are some examples of valid property assignments:
Temperature = 5
LastTemperature = Incoming.Temperature
SweepArea = POWER(Incoming.SweepRadius, 2) * 3.14157
AlertStatus = Incoming.AlertStatus
AlertStatus = "Not alerted"
DeviceEnabled = true
DeviceEnabled = DeviceInitialized AND Incoming.DeviceReady
CurrentDate = "2021-03-22T18:21"
Note
For simplicity, both property assignments and logical expressions use the “=” operator. In some cases, it may be necessary to use parentheses to avoid ambiguity.
The list of available built-in action functions can be found in the section Functions Reference. Here are some examples of action functions:
SEND_TO_DATASOURCE: Sends a message from a real-time digital twin instance back to its data source. The property values in the message are defined using a data collection.
SEND_TO_TWIN: Sends a message from a real-time digital twin instance to another instance of the same or a different model. The property values in the message are defined using a data collection.
LOG_MESSAGE: Logs an error or debug message to the model’s Status section of the ScaleOut Digital Twins UI. The message and severity are passed as parameters. Another version of this function also sends property values using a data collection.
Actions can be combined within a single rule using the AND operator, for example:
DO LastTemperature = Incoming.Temperature AND AlertStatus = Incoming.AlertStatus
DO StatusMsg = "Alerted" AND LOG_MESSAGE(4, StatusMsg)
Note
For simplicity, both logical expressions and combining actions use the AND operator. In some cases, it may be necessary to use parentheses to avoid ambiguity.
Creating and Modifying Rules
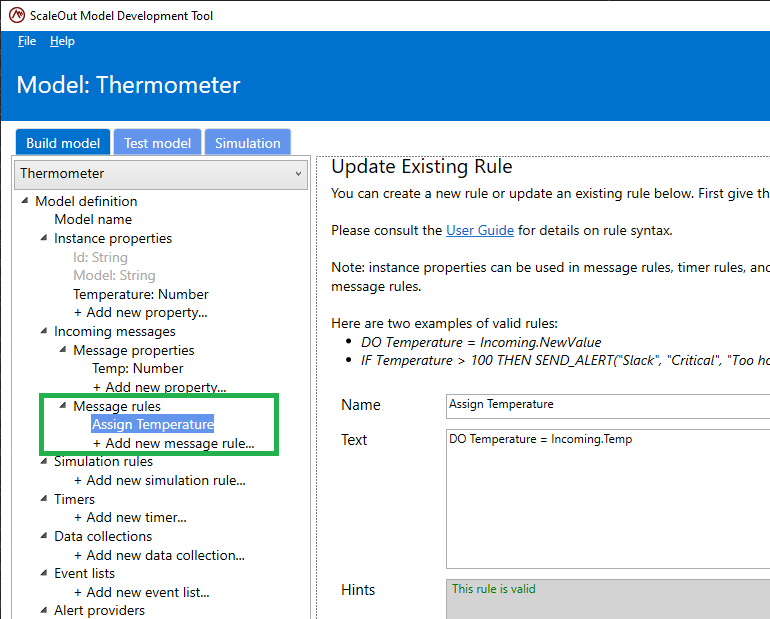
To create a new rule using the ScaleOut Model Development Tool, select Add a new rule under Rules in the left tree view. Fill in the name of the rule, and start typing the rule. The name should be descriptive so that the rule’s function is clear in the list of rules. As described above, rules can refer to instance properties or message properties.
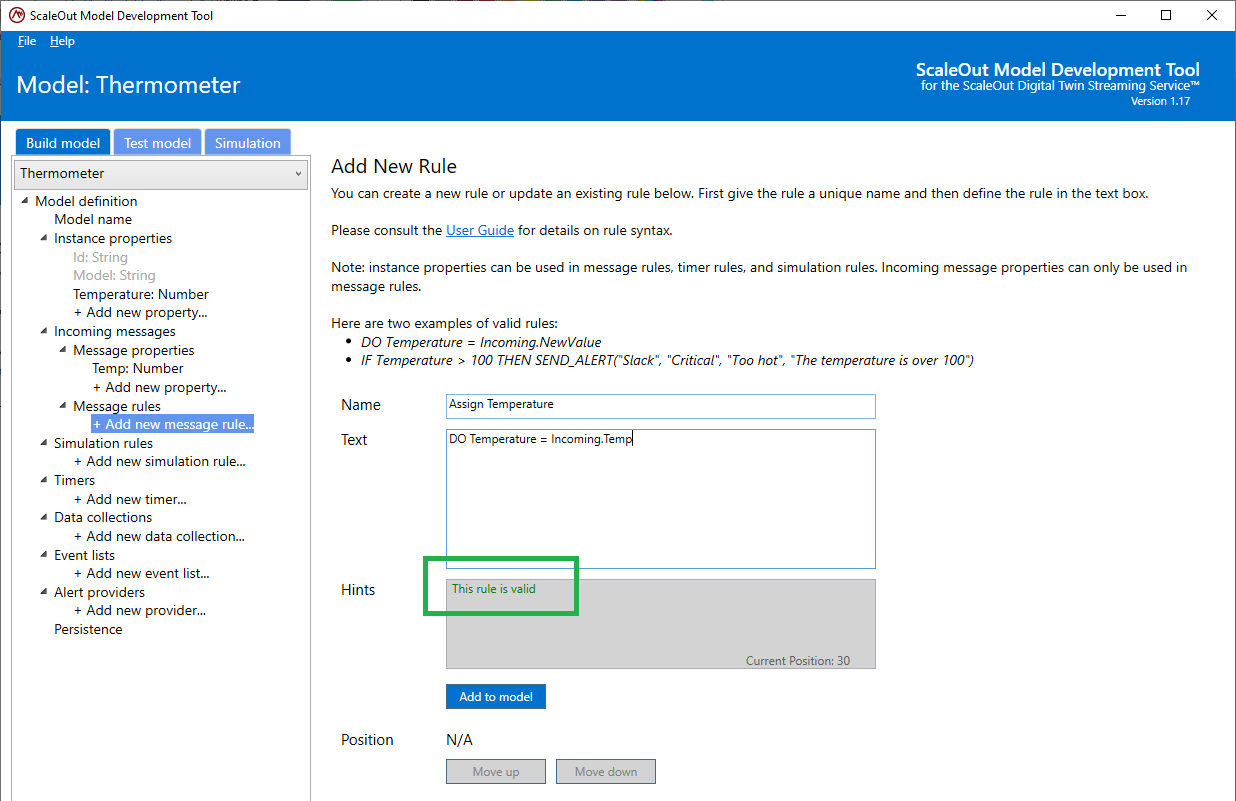
As text is typed in the Text field, some hints will be displayed in the Hints box to assist in making sure the rule is syntactically correct:

The syntax of a rule is automatically validated as you enter new characters in the Text field. If a rule is syntactically correct, the Hints box will display “The rule is valid”, indicating that the rule can be added or updated. If the rule has syntax errors, the Hints box will display messages to assist you in fixing errors.
Once the UI indicates that the rule is valid, you can add it to the list of rules by clicking on the Add button. Only valid rules can be added to the model definition:
Once you have added the rule, it appears in the tree on the left at the bottom of the list of rules. You also modify an existing rule by selecting it in the tree and editing its text. Click on Update to update the rule or Remove to remove it from the list:
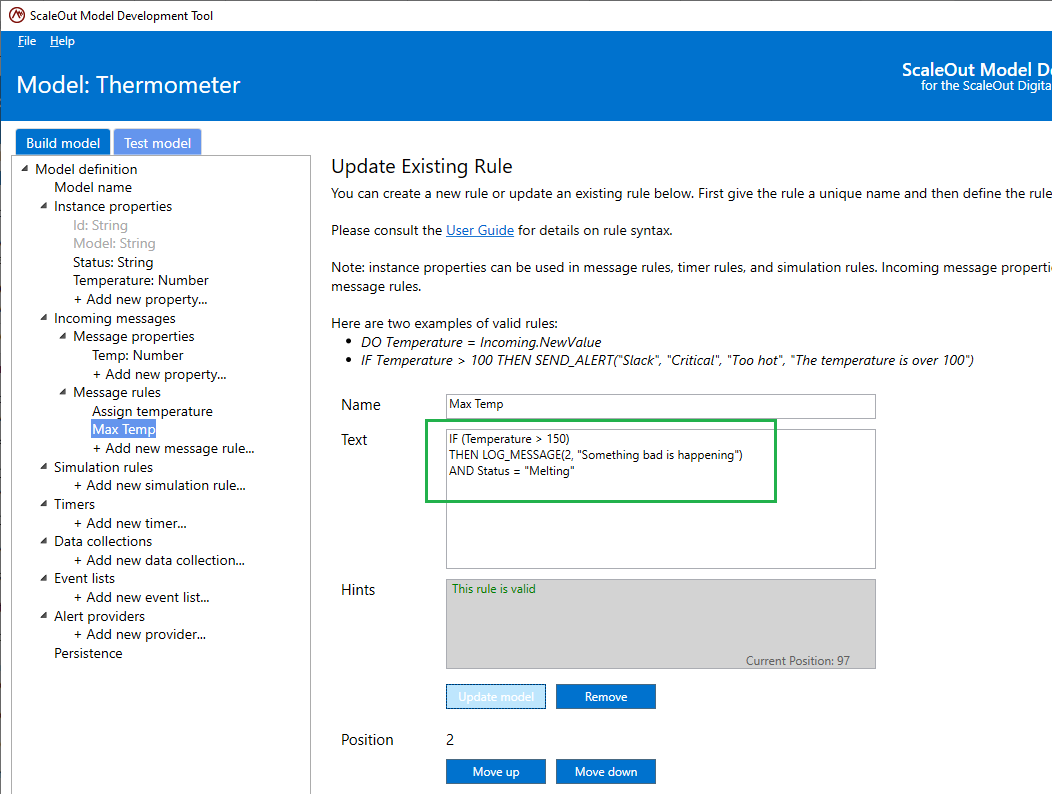
Indenting is supported in the rule definition. You also can define a rule over multiple lines and format the rule for better readability:
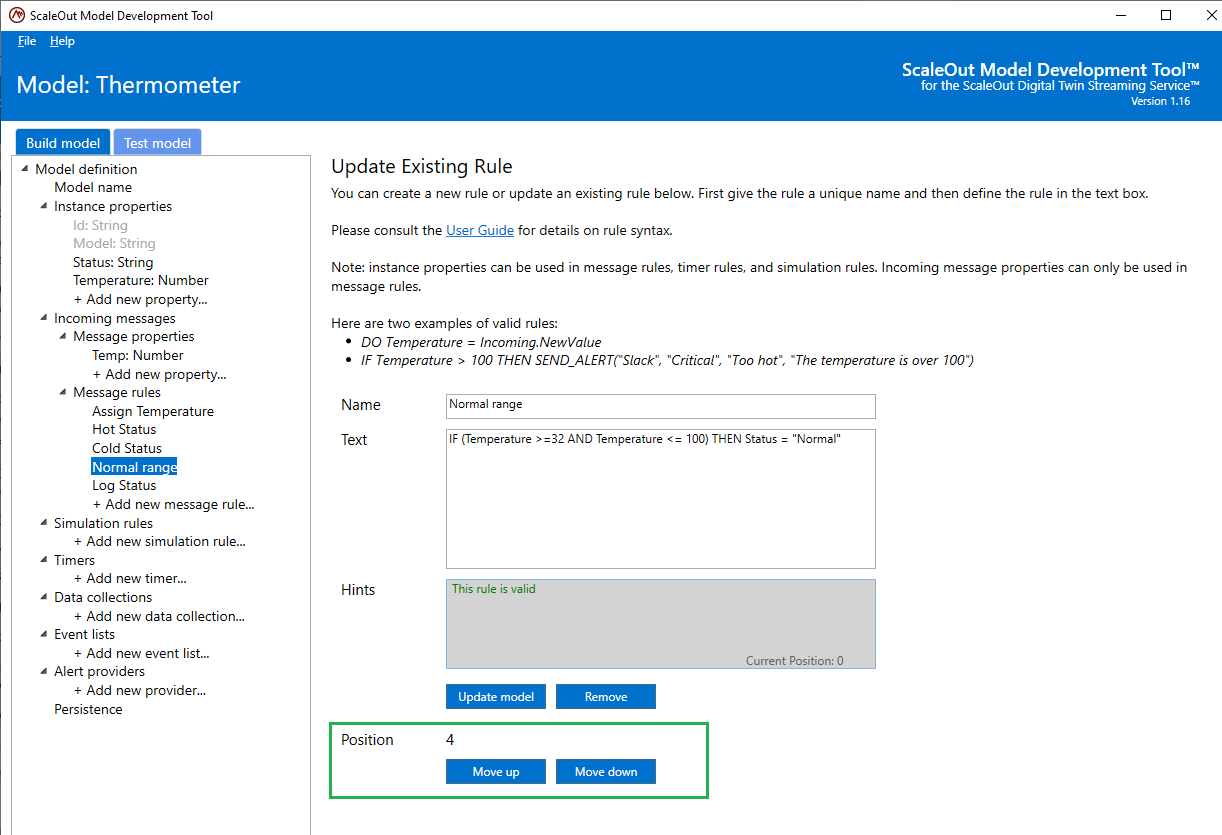
Rules are executed in the order in which they appear in this list. In order to change the position of that rule in the list, select the rule in the tree and click the Move up or Move down buttons to change its relative position.
Simulation
As described in the overview on Using Digital Twins for Simulation, digital twins can be leveraged to simulate complex systems with many entities and their interactions.
Using rule-based models for simulation only requires defining rules that are specific to the simulation mode. Unlike message rules which are executed on reception of a new message, simulation rules are executed at each simulation time step whenever the deployed model is run in simulation model.
Only instance properties can be used in simulation rules (message properties are tied to the reception of messages) but the syntax is the same as message or timer rules. In fact, as you can see in the sections below, the experience of authoring simulation rules using the ScaleOut Model Development Tool is very similar to other rules.
Once rules are authored in the tool, they can be validated within the tool before you deploy your model. Refer to Testing a model for more details on testing simulation rules in rules-based models.
Creating and modifying simulation rules
The experience is similar to message rules. In the tree, select Add new simulation rule… under the Simulation rules section. You will find the familiar rule editing interface:
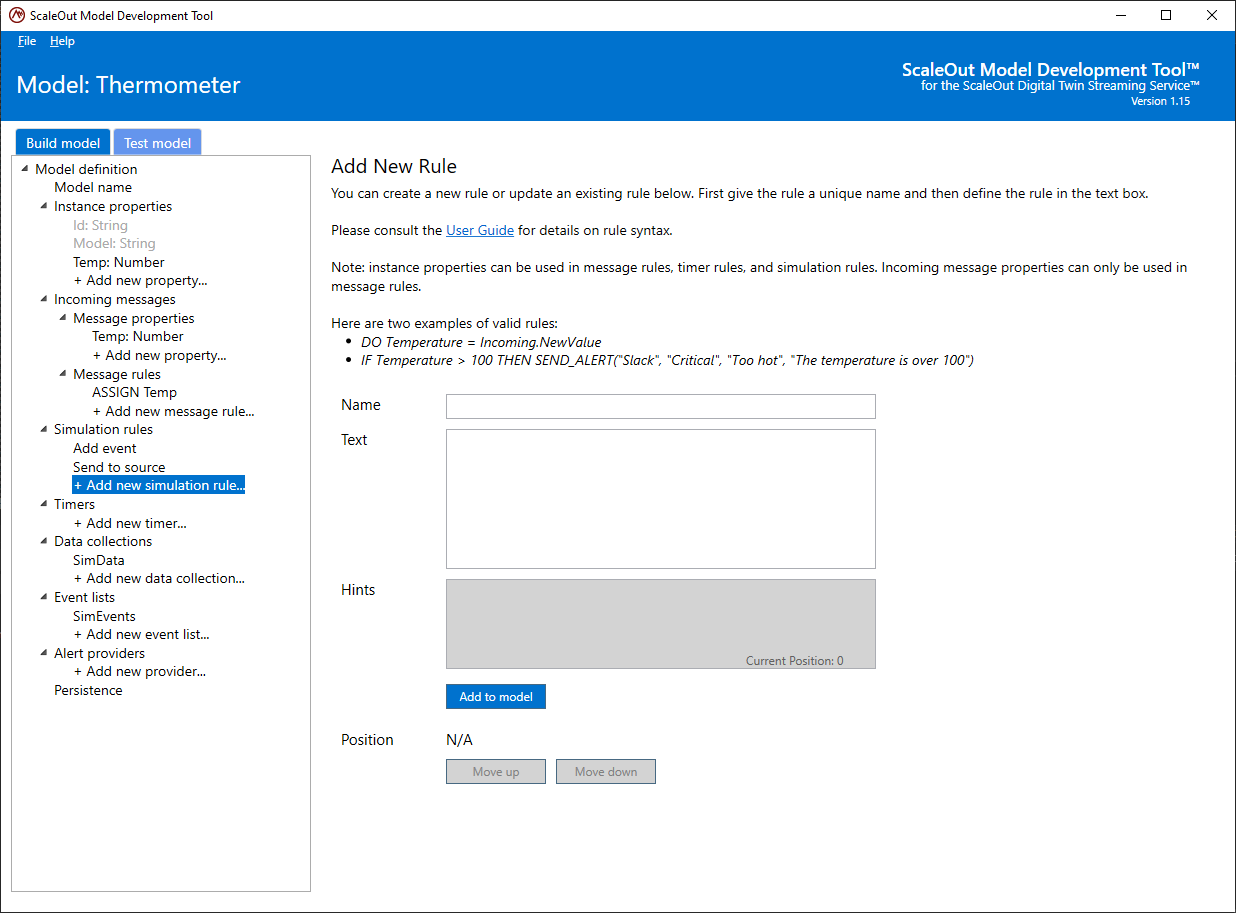
The hint box will guide you to a correct syntax for your rules. Once the rule is valid, click on Add to model to add your simulation rule to the list of simulation rules.
Simulation rules are executed in the order in which they are defined. You can move the rules up and down in the sequence of rules to change this order in the same way as .
Note
Some functions are specific to simulation and are only accessible in simulation rules. Please refer to the Simulation functions reference for details.
Functions
The ScaleOut Model Development Tool offers a variety of functions that can be used in rules to accomplish complex tasks, such as mathematical computations, string manipulation, analysis of event collections, and message sending. All function names are uppercase.
Functions can take one or more parameters, which can be properties or constants. They return a value that can be one of the available data types listed in the topic Data Types (Number, Boolean, String or DateTimeString).
Here is a simple example. You can use the MAX function in a rule to determine the higher value of two numeric properties:
DO MaxPressure = MAX(Incoming.Meter1Pressure, Incoming. Meter2Pressure)
You also can use functions to analyze the events in an event list. For example, you can count the number of events that were recorded in the last 60 seconds:
IF LAST_COUNT_EVENTS(HighTempSpikes, GETDURATIONFROMSEC(60)) > 10 THEN SEND_ALERT(...)
Note that this rule uses a helper function to easily create a duration in DateTimeString format and a third function to send an alert to an alert provider.
Function calls can be nested so that the result of one function can provide a parameter to another function call. Here is an example:
DO AbsoluteValue = ABS(MAX(Temp1, Temp2))
You can get help on all functions while using the ScaleOut Model development Tool by opening the Function Browser from the Help menu:
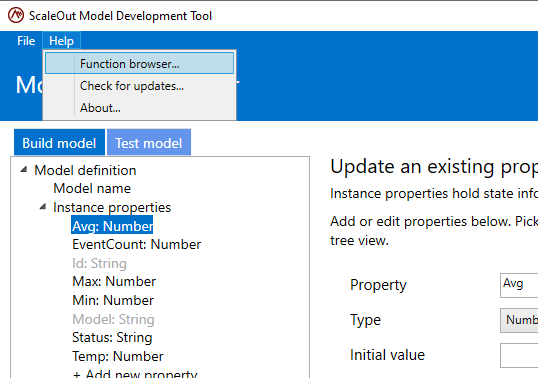
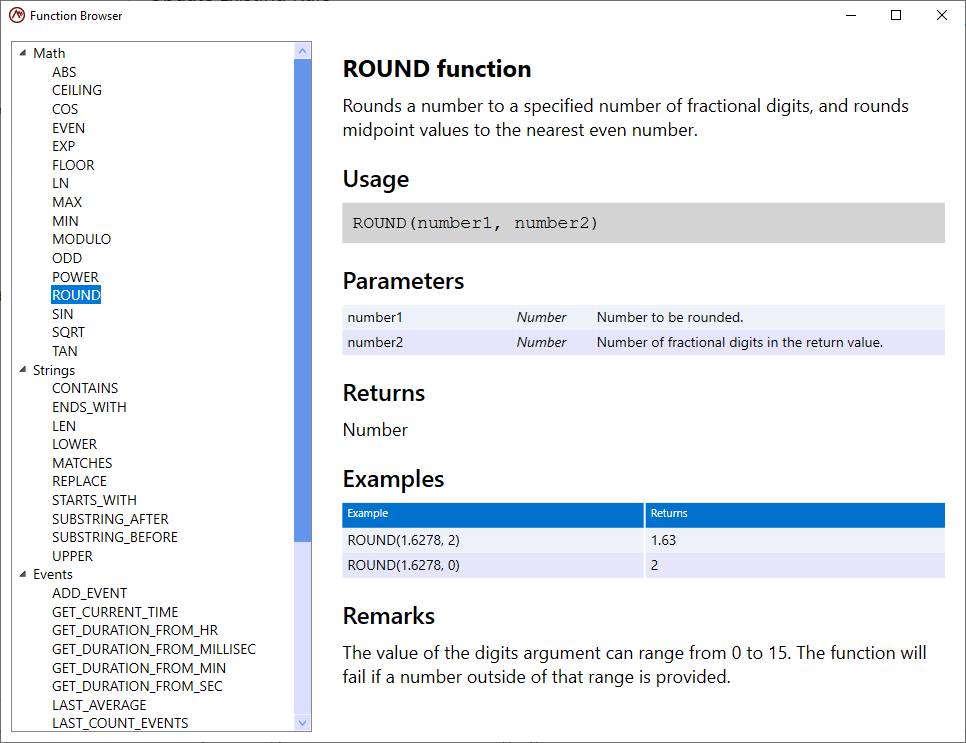
This will provide access to the list of functions and their descriptions:
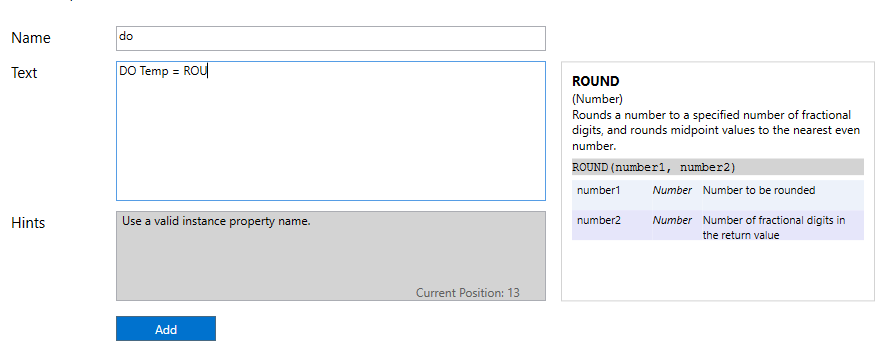
In addition, the tool provides contextual help when you are editing a rule. If you start typing the name of a function (in uppercase), contextual help will appear in the rules editor to remind you of the parameters that the function takes. You don’t need to type the entire function name to get the contextual help.
The following example shows that after you have typed the first few letters of the ROUND function, the contextual help appears and reminds you of the function usage:
Please refer to the following topic, Functions Reference, for a complete list of functions and their descriptions.
Functions Reference
This topic describes the full set of functions available in the ScaleOut Model Development Tool for building rules-based real-time digital twins. The functions are divided into the following groups:
Math functions: functions which perform mathematical operations on parameters of type Number
String functions: functions which analyze or modify parameters of type String
Event functions: functions which analyze time-stamped events recorded in event lists
Alert functions: functions which allow to send alerts to external monitoring systems
Messages functions: functions to log messages, or send messages to data sources or other digital twins
Persistence functions: functions which allow access and edits on properties persisted in external storage such as Azure Digital Twins
Timer functions: functions which allow to start and stop timers defined in your model (set of rules to run at a given interval)
Simulation functions: functions only available in simulation rules
Shared data functions: functions allowing storage and access of properties across instances or models
In the sections below, each of the functions is described to show how to use them (along with examples) and what to expect as a return value.
Math Functions
The tool offers the following functions to help with mathematical operations.
Strings Functions
Functions to help with string manipulations (e.g. retrieve the length, replace characters, match with regular expressions, etc.).
Events Functions
Event collections are managed through a few functions grouped in this category. This includes adding to a collection, but also retrieving averages, max, min values, etc.
Alerts Functions
Alerts are messages sent by digital twins to monitoring services such as Splunk On-Call, Slack or PagerDuty to alert of an event requiring attention.
Messages Functions
Functions to log messages or send messages to data sources or other twins.
Persistence Functions
Persistence providers such as Azure Digital Twins allow Real-Time Digital Twins to be preserved in some form of external storage. Functions in this category allow you to access and edit properties stored in such persisted storage.
Timers Functions
Message rules are executed when a new message arrives. Timers are sets of rules that are instead executed at an interval, independently from messages.
Simulation Functions
All functions can be used in simulation, but some functions are specific to simulation and are only available in simulation rules.
Miscellaneous Functions
Miscellaneous or general purpose functions.