Building Queries
Note
If no digital twin models have been deployed, you’ll need to deploy at least one before running any queries. See the Creating a Digital Twin Model section for more information.
To perform a query, navigate to the Build Query page in the Queries section in the left-side navigation bar.
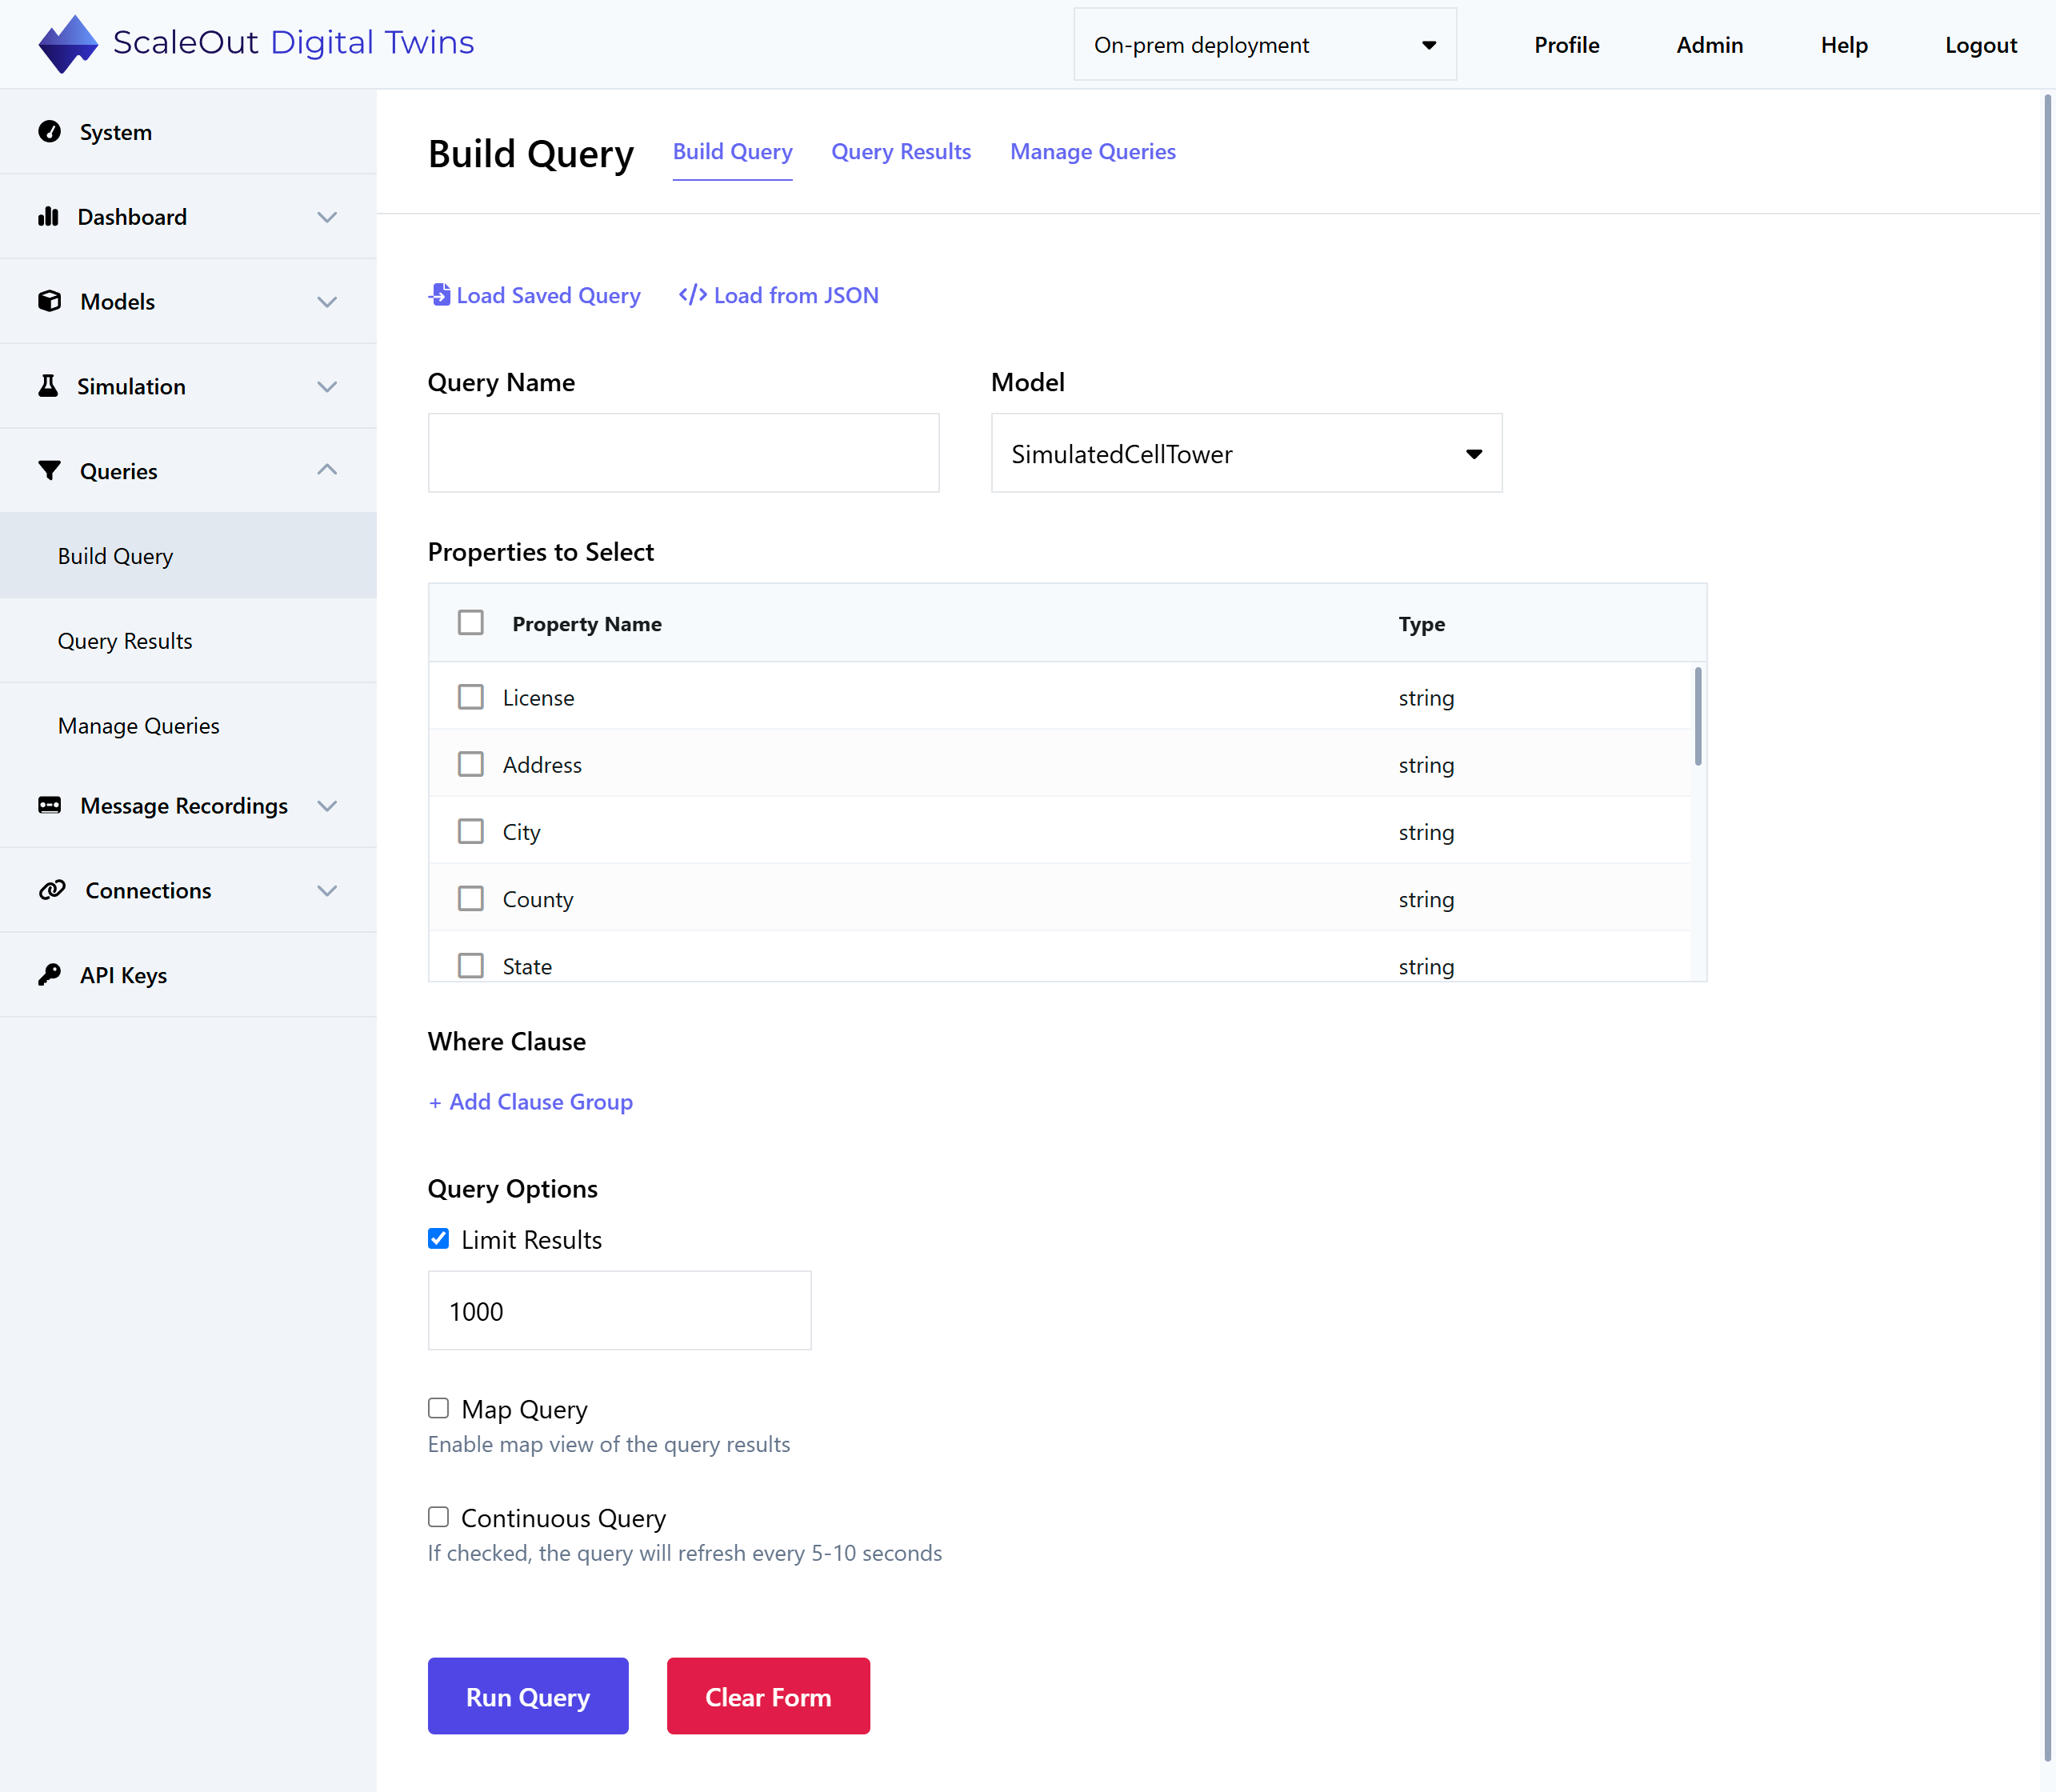
First, give the query a name and select a model to query. In the table below, select the properties of the model by checking the checkboxes next to the property names. A query must have at least one selected property.
Where Clause
Select which digital twin instances to include in the query results by adding a Where Clause. This allows you to filter digital twin instances based on a numeric or string property value, which is compared to a specified value using one of the operators in the pull-down list.
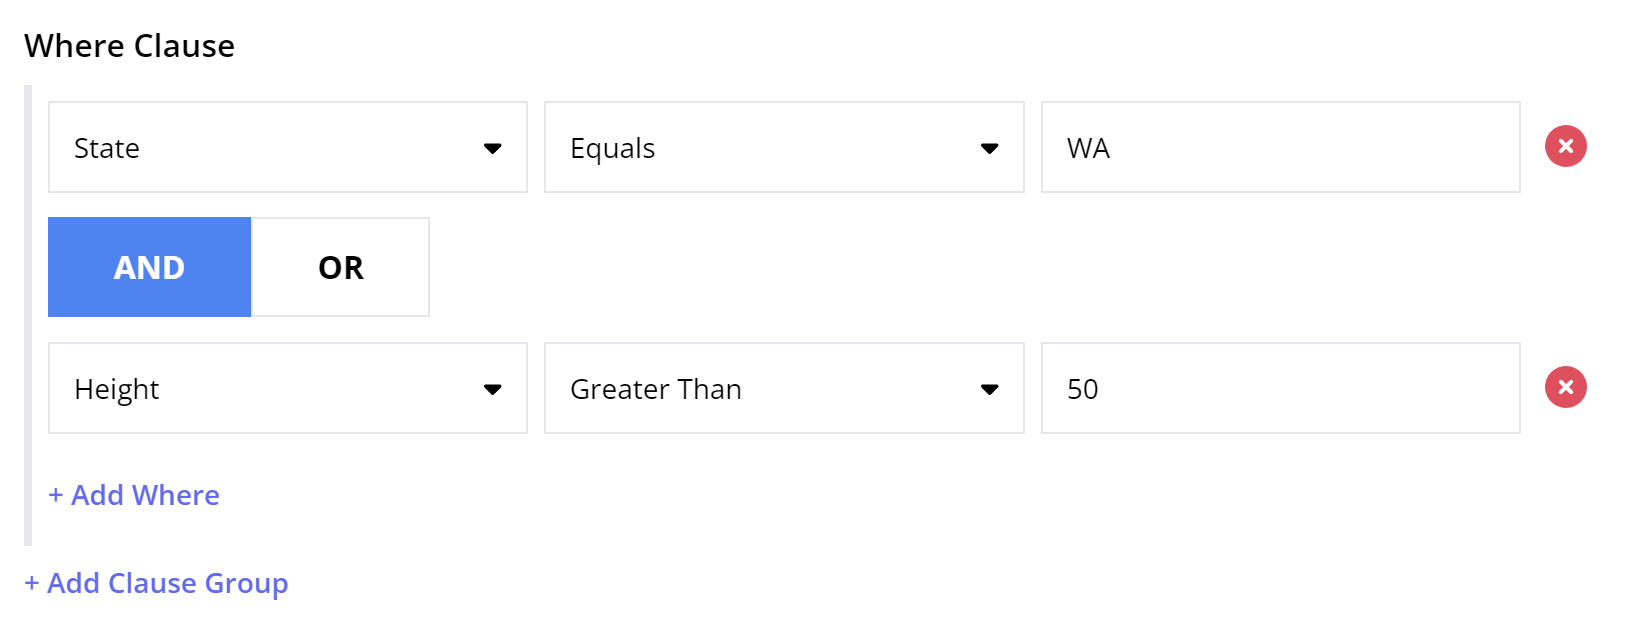
The where clause builder enables you to create clause groups, each of which consists of one or more where clauses. Each where clause operates on a single numeric or string property. Click on Add Where to add another where clause to a clause group, or add a clause group by clicking on Add Clause Group. Both where clauses and clause groups are joined together with either the logical AND or OR operator.
Hint
You can think of clause groups as adding parentheses around a set of where clauses. First, the where clauses within each group are evaluated, and next the results of the groups are combined. For example, you can express ((A and B and C) or (D and E and F)) using two clause groups, each with three where clauses.
Results Limit
You can set or adjust the number of results to retrieve by checking “Limit Results” under “Query Options” and entering a value. By default, queries are limited to 1000 results. A very large number of query results may affect performance.
Query Type
The UI supports two types of query results: Map Queries and Table Queries. Map Queries represent geographic data and must include a Latitude and Longitude property. A Map Query can be displayed as a map or a table, but a Table Query can only be displayed as a table.
Hint
The accepted names for Latitude and Longitude properties are:
Latitude/Longitude
latitude/longitude
Lat/Lon
lat/lon
Any alternative names will not be recognized by the system, which may cause the query results not to display as expected.
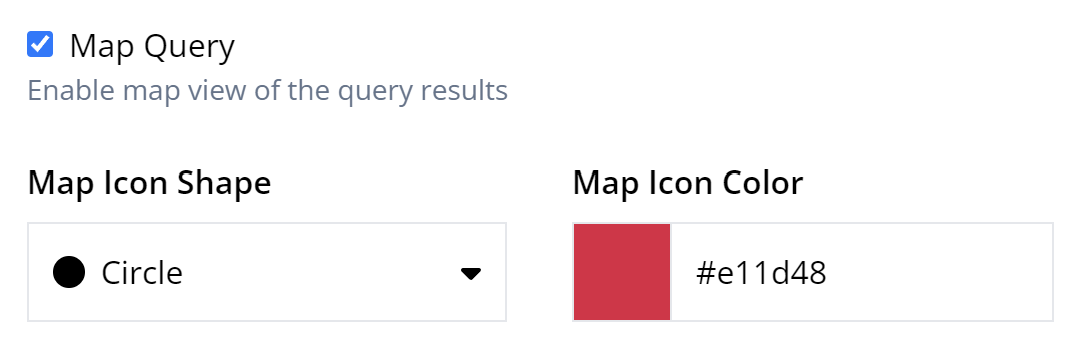
To create a Map Query, check the “Map Query” checkbox under “Query Options”. You can then select a shape and color for the map marker icon. In the color picker, you can either select a preset color or enter your own hex color.
To create a Table Query, simply leave the Map Query checkbox unchecked.
Note
If the map query checkbox is disabled, you or your administrator will need to add your own ArcGIS API key to enable the UI to connect to the map API. You can obtain a free API key at ArcGIS Developers. The administrator can add the key on the Admin page under “API Keys.”
Continuous Queries
A continuous query automatically refreshes every 5-10 seconds. In contrast, a one-time query only updates when it is manually re-run or when the page is refreshed. You may want to create a continuous query if you are tracking real-time data and want to monitor live updates without needing to refresh the page. Continuous queries are resource-intensive when running, but you can start and stop them at any time.
To make a query continuous, check the “Continuous Query” checkbox under “Query Options”. If the box is unchecked, the query will be a one-time query by default.
Trend and Anomaly Detection
If you have generative AI features enabled, you will be able to enable trend and anomaly detection for a query. See Trend and Anomaly Detection for details.
Custom Map Icons
When building a map query, you can add custom map icons in addition to the standard set of shapes. With this feature, you can use any image of your choosing to visualize your digital twins on the map.
Upload a New Icon
To upload a new icon, first ensure the Map Query checkbox is checked. Then open the Map Icon Shape dropdown menu and click + Add New Icon… at the bottom. This will bring up the Manage Custom Icons panel. Alternatively, you can also access the Manage Custom Icons panel by clicking the Manage Custom Icons button below the dropdown menu.
The Manage Custom Icons panel is shown below. The left side of the panel allows you to upload a new icon to the UI, and icons you have already uploaded are displayed on the right. To upload a new icon, choose an image file and specify a display name, then click Upload Icon. The icon file must be a PNG, GIF, or SVG and less than 100 kB.
Hint
For best results, the icon image should meet these criteria:
Transparent background
200x200 px or less (if PNG or GIF)
Square aspect ratio
Icons that are not square or that are larger than 200x200 px will be resized automatically.
Use a Custom Icon
Custom icons you upload will appear in the Map Icon Shape dropdown menu below the standard icons. Just choose the icon from the menu to use it in the query. Also, in the Manage Custom Icons panel, you can double-click any icon shown on the right to apply it to the query.
Note that the Map Icon Color field is disabled when a custom icon is selected. The icon will appear on the map exactly as it appears in the dropdown menu.
Delete Custom Icons
To delete custom icons, first open the Manage Custom Icons panel by clicking Manage Custom Icons… below the Map Icon Shape dropdown menu. Then select any icons you’d like to delete and press Delete Selected. The icons will be removed from the system.
Warning
If the deleted icon(s) are currently used by any query, that query will not display properly until it is edited to use a different icon.
Once you are done with the Build Query form, run the query by clicking Run Query at the bottom of the page. You will be redirected to the query results page. To reset the form and start over without running the query, click Clear Form.
In the next section, you’ll learn about running queries and navigating query results.